Pages

Sunday, October 30, 2011

Key Lime Pie


After making a fabulous Apple Pie last week, I wanted to try my hand at some more varieties of pie. I checked Joy of Baking and the Key Lime Pie just jumped at me. Of course I had never eaten one before and didn’t even know what it was. But the description was enough to reel me in. I tried to search for Key limes but could not get them anywhere so I substituted for the Persian limes (and now I at least know the difference between a lime and a lemon)

I must say that I did not love this pie but I surely liked it. It was a bit too tart for me and I think cutting back a little on the lime juice would be perfect. I did add more sugar to the whipped cream than the recipe called for and this was to balance the tartness a little. Because we rarely use lemon in desserts in India I am not a fan of them. But if you a like a combination of tart and sweet this is definitely a good recipe. It is smooth, creamy and the crust is amazing.

Recipe Source - Given as is from Joy Of Baking with my comments in red.

Ingredients - Makes 1 - 9 inch (23 cm) pie

For the Crust
1 1/4 Cup (125 Grams) Graham Cracker Crumbs (I used Crushed Digestive Biscuits)
2 Tbsp(30 grams) Granulated White Sugar
5 - 6 Tbsp (70 - 85 Grams) Unsalted Butter, Melted
For The Filling
3 Large Egg Yolks, Room Temperature
One 14 - Ounce (390 Grams) Can Sweetened Condensed Milk
1/2 Cup (120 ml) Key Lime Juice (I used Regular Limes) ( I would reduce this to 1/4 Cup as I don't like anything too tart)
2 Tsp Grated Lime Zest (Outer Skin)
For The Topping
1 cup (240 ml) Cold Heavy Whipping Cream (Double Cream) (35-40% Butterfat Content)
2 Tbsp (30 grams) Granulated White Sugar (I used 4 Tbsp)

1. Preheat the oven to 350 degrees F (177 degrees C) and place the oven rack in the center of the oven. Butter or lightly spray with a non stick vegetable spray, a 9 inch (23 cm) pie or tart pan.  

Make The Crust
1. Mix together the graham cracker crumbs, sugar, and melted butter. Press onto the bottom and up the sides of the prepared pan. Bake for about 10 minutes or until set and lightly browned. Remove from oven and place on wire rack to cool while you make the filling

Make The Filling
1. In the bowl of your electric mixer, with the whisk attachment, beat the egg yolks until pale and fluffy (2-3 minutes).
2. Gradually add the condensed milk and beat until light and fluffy (3-5 minutes). Scrape down the sides of the bowl and then beat in the lime juice and zest. 
3. Pour the filling over the crust and bake for about 10 - 15 minutes, or until the filling is set. Remove from oven and place on a wire rack to cool. Once it has completely cooled, cover and refrigerator for several hours or overnight.

Make The Topping
1. Once the filling has chilled, in the bowl of your electric mixer, with the whisk attachment (or with a hand mixer), beat the whipping cream and sugar until stiff peaks form. Either pipe (I used a Wilton 1M star tip) or place mounds of whipping cream on top of the filling. Can be stored in the refrigerator for a few days.
Happy Eating!!

Thursday, October 27, 2011

Daring Bakers - October 2011 - Povitica!!!


I have been so lost lately. Its been a long time since I actually did something productive (except at work mind you) and after skipping so many daring bakers challenges I really wanted to get up and do something. So that is exactly what I did the moment I saw the challenge go up on the first of the month. Yup, that's right, I was one of the first ones to complete the challenge (after Audax of course) and I had a great time making this.

Povitica (pronounced po-va-teet-sa) is traditional Eastern European dessert bread that is traditionally served during the holiday season. This was really a big challenge for me as it was a completely new type of bread and the dough was sooo tough to work with. The problem was that  the gluten was not rested enough and so the dough was not stretching out. Wish I had known that before I started making it! Anyways, I did get good results and had an amazing loaf of sweet bread, The filling is fantastic. I actually ate toasted slices of the bread for breakfast each day! Yum! I would definitely make this again and even try savoury fillings as some of the other daring bakers.

The recipe is a long one with at least 30 steps but it is not difficult. The only challenging part is rolling out the dough which should not be a problem if your dough is rested. I made only a quarter of the recipe and this is enough for one loaf.

Blog-checking lines: The Daring Baker’s October 2011 challenge was Povitica, hosted by Jenni of The Gingered Whisk. Povitica is a traditional Eastern European Dessert Bread that is as lovely to look at as it is to eat!

Recipe here...

Monday, October 17, 2011

Apple Pie


I baked my very first apple pie when I was 17 years old. I had not been bitten by the baking bug back then (say that fast 5 times!) but it was my sister who was into it a lot. It was she who taught me how to macerate apples and knead a nice dough for the pastry. Ever since my first bite, Apple pie has been my all time favorite dessert.

Of all the times that I have made this I have never used an actual recipe or measurements until now. I would just throw together the ingredients and take it from there. This time I decided to use the recipe from Joy of Baking and see if my pie was good or not. And I am pleased to say that my pie is as good (if not better) than this one right here. It is everything I love; cinnamoney, flakey, sweet... This recipe is definitely a keeper!

Every time I bake a pie I remember one of my sisters who would never eat the filling but only the crust! I would bake the scraps of the dough separately just to make her happy. Oh what good times!

Recipe Source - Given as is from Joy of Baking, with my changes in red

Ingredients - Makes one 9 inch (23 cm) pie

For The Pie Crust
2 1/2 Cups (350 grams) All-purpose flour
1 Tsp Salt
2 Tbsp (30 grams) Granulated White Sugar
1 Cup (226 grams) Unsalted Butter, Chilled, And Cut Into 1 Inch (2.5 Cm) Pieces
1/4 to 1/2 Cup (60 - 120 ml) Ice Water
For The Apple Filling
2 1/2 Pounds (1.1 Kg) Apples (About 6 Large), Peeled, Cored, And Sliced 1/4 Inch Thick (About 8 Cups (2 L)) - I chopped my apples instead of slicing them.
1/4 Cup (50 Grams) Granulated White Sugar
1/4 Cup (55 grams) Light Brown Sugar
1 Tbsp Lemon Juice
1 Tsp Ground Cinnamon
1/4 Tsp Ground Nutmeg (Optional) - Omitted
1/4 Tsp Salt
2 Tbsp (28 grams) Unsalted Butter
1 1/2 Tbsp (15 grams) Cornstarch (Corn Flour)

Make the Pie Crust
1. In a food processor, place the flour, salt, and sugar and process until combined. Add the butter and process until the mixture resembles coarse meal (about 15 seconds).
2. Pour 1/4 cup (60 ml) water in a slow, steady stream, through the feed tube until the dough just holds together when pinched. If necessary, add more water. Do not process more than 30 seconds.
3. Turn the dough onto your work surface and gather into a ball. Divide the dough in half, flattening each half into a disk, cover with plastic wrap, and refrigerate for about one hour before using. This will chill the butter and relax the gluten in the flour. 
4. After the dough has chilled sufficiently, remove one portion of the dough from the fridge and place it on a lightly floured surface. Roll the pastry into a 12 inch (30 cm) circle. (To prevent the pastry from sticking to the counter and to ensure uniform thickness, keep lifting up and turning the pastry a quarter turn as you roll (always roll from the center of the pastry outwards).)
5.  Fold the dough in half and gently transfer to a 9 inch (23 cm) pie pan ( I used a 10 inch pan). Brush off any excess flour and trim the edges of the pastry to fit the pie pan. Cover with plastic wrap and place in the refrigerator. 
6. Then remove the second round of pastry and roll it into a 12 inch (30 cm) circle. Transfer to a parchment lined baking sheet, cover with plastic wrap, and place in the refrigerator.  I made a lattice top instead
 
Make the Apple Filling
1. In a large bowl combine the sliced apples with the sugars, lemon juice, ground cinnamon, nutmeg, and salt. Let sit at room temperature for at least 30 minutes or up to three hours. Then, place the apples and their juices in a strainer that is placed over a large bowl (to capture the juices). Let the apples drain for about 15-30 minutes or until you have about 1/2 cup (120 ml) of juice.
2.  Spray a 4 cup (960 ml) heatproof measuring cup with a nonstick vegetable spray, and then pour in the collected juices and the 2 tablespoons (28 grams) of unsalted butter. Place in the microwave and boil the liquid, on high, about 5 to 7 minutes or until the liquid has reduced to about 1/3 cup (80 ml) and is syrupy and lightly caramelized.  (Alternatively, you could place the juices and butter in a small saucepan and boil over medium high heat on the stove.)  - I used the stove top method.
3. Meanwhile, remove the top pastry crust from the refrigerator and let it sit at room temperature for about 10 minutes so it has time to soften.
4. Transfer the drained apples slices to a large bowl and mix them with the cornstarch (corn flour). 
5. Then pour the reduced syrup over the apples and toss to combine.
6. Pour the apples and their syrup into the chilled pie crust. Moisten the edges of the pie shell with a little water and then place the top crust over the apples. Tuck any excess pastry under the bottom crust and then crimp the edges using your fingers or a fork. Using a sharp knife, make five- 2-inch (5 cm) slits from the center of the pie out towards the edge of the pie to allow the steam to escape. Cover the pie with plastic wrap and place in the refrigerator to chill the pastry while you preheat the oven. - I cut the rolled dough into strips and made the lattice top at this point.
7. Preheat the oven to 425 degrees F (220 degrees C). Place the oven rack at the lowest level and place a baking stone or baking sheet on the rack before preheating the oven. Place a piece of aluminum foil on the stone (or pan) to catch any apple juices. Set the pie on the stone or pan and bake for about 45 to 55 minutes or until the juices start to bubble through the slits and the apples feel tender (not mushy) when a toothpick or sharp knife is inserted through one of the slits. Make sure to cover the edges of the pie with a foil ring to prevent over browning after about 30 minutes. Remove the pie from the oven and place on a wire rack to cool for about 3-4 hours before cutting. Serve warm or at room temperature with vanilla ice cream or softly whipped cream. Store at room temperature for 2 to 3 days.

Happy Eating!!

Sunday, October 2, 2011

Celebrating with Caramel Apple Shooters!!


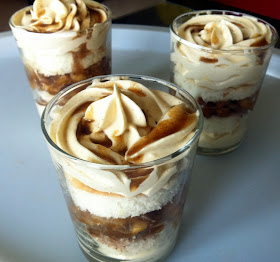
We had a dinner party this weekend to celebrate a long awaited event. What, you ask? Well, hubby has just graduated from college!!! I am so proud of him and was bursting with joy when his results were announced. To celebrate the occasion we invited a few of his closest friends for dinner and I cooked up the usual Indian fare. I wanted to try something new for dessert and when I saw these shooters on the Half Baked blog I knew I wanted to try them as I love fall flavors. It is basically a cinnamon swirl cake with a layer of caramelized apples and cinnamon cream cheese frosting. It is a rich dessert and can be served in small portions. I did not have shot glasses so I made them in a little bigger size. This can also be made as a layer cake (yum!) I used a box mix to save up on time as I had a lot of stuff to do.


Recipe Source - Half Baked (I made a few changes which are given below)

Ingredients
For Cinnamon Swirl Cake
1 White Box Mix (And other ingredients asked for on the box) or any White Cake recipe
1 Tbsp Cinnamon Powder

For the Caramelized Apples
1/2 Cup Brown Sugar
1/4 Cup Water
2 Cups Chopped Apples
1 Tsp Cinnamon
A Pinch of Salt

For the Cinnamon Cream Cheese Icing
1 Package (200 Gms) Cream Cheese (At Room Temperature)
1 Stick Butter (At Room Temperature)
1 Cup Powdered Sugar
1 Tsp Vanilla Essence

Make The Cake
Mix the batter for the white cake according to package directions. Remove 1/2 Cup of batter in a cup and mix the cinnamon powder to it. Pour the white batter in a jelly roll pan and add dollops of the cinnamon batter. Swirl lightly with a toothpick and bake till done.

Make The Caramelized Apples
Place all the ingredients in a saucepan over medium heat. Stir lightly till the sugar melts, then reduce the flame to low. Cook the apples till softened.

Make The Icing
Beat all ingredients with a mixer until light and fluffy.  Fill a piping bag fitted with large round tip.

Assemble The Dessert
You can use any type of glass or bowl.
1. Add a dollop of the icing on the bottom.
2. Using a round cookie cutter cut a circle from the cake (same size as the glass or bowl). Add the circle on the icing.
3. Add a tablespoon of the cooked apples.
4. Add another circle of cake and top with a layer of icing.
5. Drizzle a little of the liquid from the caramelized apples.
6. Serve at room temperature. Store in the refrigerator.
Happy Eating!!