My in laws have come to Dubai to stay with us. Life over here is completely different from what they are used to in their hometown Karwar. We took them around to see the various shopping malls, taste some of the local and international food, had picnics at the beautiful parks, and did a little bit of shopping. It’s almost time for them to go back and I hope they enjoyed their stay at our place.
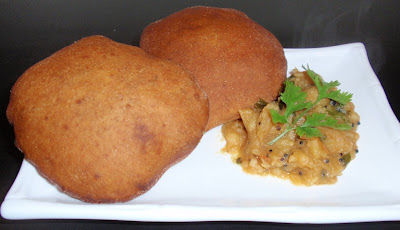
As I work 9 to 5 I have developed my own style of cooking, I usually do one pot dishes of rice with meat or veggies or simple dishes requiring least amount of time with roti. I also don’t make breakfast coz I don’t have time in the morning (or maybe coz I’m too lazy to wake up early and cook hehehe) Ammi (mother in law) cooks breakfast everyday and makes the traditional breakfast items like dosa, idli, poha etc. The other day we had a few ripe bananas (which no one was ready to eat… poor things...) and she decided to make buns. Buns are a very common breakfast item in Karnataka and I love the taste of them which are usually served with Green chutney. Once when I was in Goa we went to a restaurant for some traditional Goan breakfast. The last thing I expected was the owner to tell us that Buns bhajji is a very popular item. They serve Buns with a potato gravy. I was skeptical to try this but the combination was awesome and I loved it. Yesterday I made the potato gravy and we had it with hot and crispy buns for dinner. The below measurements are approximate. These did not have the spongy interior like those we get back home. Guess we will have to learn a lot more!!
Recipe
Banana Buns
Ingredients
2 Ripe Bananas (Large Ones eg. Chiquita)
1/2 Cup Jaggery Pieces
1/4 Tsp Baking Soda
1 1/2 Tsp Cumin Seeds
½ Cup Yogurt
1/8 Tsp Salt
1 1/2 Cups All-purpose Flour (Maida)
1/2 Cup Wheat Flour
1/2 Stick Unsalted Butter
2 Cups Oil (Or More For Frying)
Place the peeled bananas, yogurt, jaggery, baking soda and salt in a blender and make a smooth paste.
Pour into a kneading bowl, add the softened butter and mix well. Start mixing the maida and keep kneading to make soft and smooth dough. Add the wheat flour and knead well. If the dough is sticky add as much flour required to make it smooth and non sticky just like a Chapatti dough.
Cover the dough with a wet cloth or place in an air tight container and keep for 1-2 hours. When ready to fry, make small balls out of the dough and roll out with a little flour to prevent sticking. You can roll out all the buns before starting to fry for easier handling.
Heat the oil and slowly leave one rolled out bun into the kadai. The buns will puff up only if the oil is hot so ensure the oil is well heated before frying. Turn the bun once and remove when golden brown. Serve hot with green chutney or potato bhaji.
Potato Bhaji
Ingredients
2 Large Potatoes (Boiled and Quartered)*
1 Large Onion (Chopped)
1 Medium Tomato (Chopped)
Few Curry Leaves
1 Tsp Mustard Seeds
1 Tbsp Ginger Garlic Paste
1/2 Tsp Turmeric Powder
4-5 Green Chilies (Slit Vertically Half Way)
Salt To Taste
Fresh Coriander (Chopped)
4 Tbsp Oil
Water For Cooking
Heat oil in a pan, add the mustard seeds and let them splutter. Add the curry leaves, green chilies and onions. Fry till the onions are translucent. Add the tomato pieces and the ginger garlic paste. Cook till the tomatoes are soft. Add the potato pieces, turmeric powder, salt and enough water to cover the potato pieces. Stir well, cover and cook on low heat till the potatoes are cooked. Mash slightly with the back of the spoon and garnish with coriander leaves. Serve Hot!
*- as I mentioned I am often pressed for time to finish cooking, so I got this quick and easy way of cooking a potato in the microwave. There is no need to boil the water and wait for ages till the potato is done.
Take a potato and wash it well. Prick it all over with a fork and place it in a microwave safe bowl. Place the bowl in the microwave and cook it for 3 minutes. Remove from the microwave, turn it around and sprinkle some more water on it. Place it back in the microwave and cook it for 3 more minutes. Insert a knife to see if it is done. Remove and peel. Ta da!!! Instant baked potato!!
Happy Eating!!


No comments:
Post a Comment
Hi there! If you have any thoughts, queries or suggestions please do let me know. I would love to hear from you!