Pages

Wednesday, December 30, 2009

Mera Lazywala Maggi


If you have been watching Indian television you will definitely understand the title of this post. Some days when I come home from office I don’t feel like cooking anything (that’s most of the days actually hehehe) but alas a housewife’s duty calls and thou shall feed your lazy husband reverberates in my ears. Eating out in our area is a bit expensive so I try to make something instant and what can be more easier than instant noodles!! Usually I just throw in whatever I have in the fridge but this is the version that I love the most. That’s why this is my lazy maggi.
Maggi has been with me since childhood and whenever there was nothing in the house this was a quick solution to satisfy hungry tummies. It is also a great way to sneak those veggies into your child’s diet. So if you are in one of those lazy moods, or don’t have anything else in the house, make a huge pot of this and watch the smiles on everyone around you.

Recipe (Serves 2)

Ingredients
2 Packets noodles (any brand like Maggi will do)
1 Cup Mixed Vegetables*
1 Onion (Sliced)
2 Chicken Franks (Sausages – Cut In Small Pieces) **
2 Tbsp Butter
2 Tsp Red Chili Powder
1/4 Tsp Turmeric Powder
1 Tsp Coriander Seeds Powder
2 Tbsp Oil
Coriander Leaves (For Garnish)

In a pot, heat the oil and sauté the onions till golden brown. Add the butter, sausage pieces, vegetables, red chili powder, coriander powder and turmeric powder. Sauté till the veggies are cooked.


Remove this to a plate and fill the same pot with water. I always cook my Maggi in less water than called for on the packet as I don’t like it to be watery. Open all the masala packets that come with the noodles and mix in the water. Once the water comes to a boil throw in the noodles and let it cook.


When the noodles are done and a little water is left add the cooked vegetables and toss well. Garnish with coriander leaves and serve hot.
*- I mostly use a mixed pack of frozen vegetable (carrots, peas, Beans, Corn etc) coz I am too lazy to cut the fresh ones or there are no fresh ones in the house.
**- If you don’t have sausages you can use 1/2 cup boiled chicken pieces (boneless) or omit the meat completely.

Happy Eating!!

Tuesday, December 29, 2009

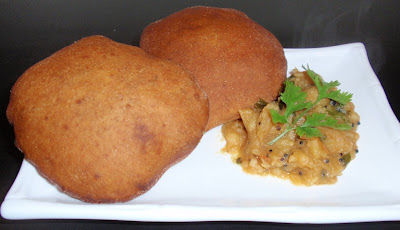
Banana Buns with Potato Bhaji


My in laws have come to Dubai to stay with us. Life over here is completely different from what they are used to in their hometown Karwar. We took them around to see the various shopping malls, taste some of the local and international food, had picnics at the beautiful parks, and did a little bit of shopping. It’s almost time for them to go back and I hope they enjoyed their stay at our place.
As I work 9 to 5 I have developed my own style of cooking, I usually do one pot dishes of rice with meat or veggies or simple dishes requiring least amount of time with roti. I also don’t make breakfast coz I don’t have time in the morning (or maybe coz I’m too lazy to wake up early and cook hehehe) Ammi (mother in law) cooks breakfast everyday and makes the traditional breakfast items like dosa, idli, poha etc. The other day we had a few ripe bananas (which no one was ready to eat… poor things...) and she decided to make buns. Buns are a very common breakfast item in Karnataka and I love the taste of them which are usually served with Green chutney. Once when I was in Goa we went to a restaurant for some traditional Goan breakfast. The last thing I expected was the owner to tell us that Buns bhajji is a very popular item. They serve Buns with a potato gravy. I was skeptical to try this but the combination was awesome and I loved it. Yesterday I made the potato gravy and we had it with hot and crispy buns for dinner. The below measurements are approximate. These did not have the spongy interior like those we get back home. Guess we will have to learn a lot more!!

Recipe

Banana Buns

Ingredients
2 Ripe Bananas (Large Ones eg. Chiquita)
1/2 Cup Jaggery Pieces
1/4 Tsp Baking Soda
1 1/2 Tsp Cumin Seeds
½ Cup Yogurt
1/8 Tsp Salt
1 1/2 Cups All-purpose Flour (Maida)
1/2 Cup Wheat Flour
1/2 Stick Unsalted Butter
2 Cups Oil (Or More For Frying)

Place the peeled bananas, yogurt, jaggery, baking soda and salt in a blender and make a smooth paste.
Pour into a kneading bowl, add the softened butter and mix well. Start mixing the maida and keep kneading to make soft and smooth dough. Add the wheat flour and knead well. If the dough is sticky add as much flour required to make it smooth and non sticky just like a Chapatti dough.
Cover the dough with a wet cloth or place in an air tight container and keep for 1-2 hours. When ready to fry, make small balls out of the dough and roll out with a little flour to prevent sticking. You can roll out all the buns before starting to fry for easier handling.
Heat the oil and slowly leave one rolled out bun into the kadai. The buns will puff up only if the oil is hot so ensure the oil is well heated before frying. Turn the bun once and remove when golden brown. Serve hot with green chutney or potato bhaji.

Potato Bhaji

Ingredients
2 Large Potatoes (Boiled and Quartered)*
1 Large Onion (Chopped)
1 Medium Tomato (Chopped)
Few Curry Leaves
1 Tsp Mustard Seeds
1 Tbsp Ginger Garlic Paste
1/2 Tsp Turmeric Powder
4-5 Green Chilies (Slit Vertically Half Way)
Salt To Taste
Fresh Coriander (Chopped)
4 Tbsp Oil
Water For Cooking

Heat oil in a pan, add the mustard seeds and let them splutter. Add the curry leaves, green chilies and onions. Fry till the onions are translucent. Add the tomato pieces and the ginger garlic paste. Cook till the tomatoes are soft. Add the potato pieces, turmeric powder, salt and enough water to cover the potato pieces. Stir well, cover and cook on low heat till the potatoes are cooked. Mash slightly with the back of the spoon and garnish with coriander leaves. Serve Hot!

*- as I mentioned I am often pressed for time to finish cooking, so I got this quick and easy way of cooking a potato in the microwave. There is no need to boil the water and wait for ages till the potato is done.
Take a potato and wash it well. Prick it all over with a fork and place it in a microwave safe bowl. Place the bowl in the microwave and cook it for 3 minutes. Remove from the microwave, turn it around and sprinkle some more water on it. Place it back in the microwave and cook it for 3 more minutes. Insert a knife to see if it is done. Remove and peel. Ta da!!! Instant baked potato!!

Happy Eating!!

Sunday, December 27, 2009

3 Idiots and a bag of popcorn


I love eating theatre popcorn. What is theatre popcorn you ask? Well, its popcorn made by heaps and eaten while watching movies!! I absolutely love caramel popcorn. The warm, crispy, sweet temptation always makes me happy (along with a sugar overdose) and completes my movie experience. I saw a recipe for it on Annie's Eats and hopefully when I have kids [to share the guilt with ;)] I will enjoy making and eating this with them.
Yesterday we went see 3 Idiots. Going in at 10:30 pm we came out only by 1:45 am (phew). It was a long movie but well worth the time and money! Total Paisa Vasool!!! I was actually holding my sides and laughing in a few scenes. The film has done a refreshing take to show what is wrong in our education system. The mindless lectures without understanding, by rote learning and even sensitive topics such as student suicide and ragging. I hope by watching this movie students do learn that getting good grades and coming first is not the only thing. Its the experience that matters and what you eventually gain from it. Yes, I did get good grades in college and was one of the top three ranks but I was very lucky to study in a college that belied conventional means of teaching. We had only 12 students per class and instead of lecturing us our professors believed in group discussions, brainstorming and seminars by the students themselves.
After finishing my degree I emerged as a much more rounded individual who thoroughly enjoyed her 3 years of college.
Well, enough of my banter for now. Make sure you watch this movie as it is truly an enjoyable one. And don't forget that bag of popcorn. Theatre popcorn to be exact :)

Happy Eating!!!

Friday, December 25, 2009

Mutton Curry and Pulav


Latif's cousin and her family had come home today to spend the day (we live in a beautiful colony with lots of trees that you will never find elsewhere in Dubai!!). We (my mother-in-law and I) decided to make the traditional Mutton Curry with Rice. This curry is typical south Indian (more related to Karnataka) cuisine made with coconut. The spices and coconut are dry roasted before grinding to a paste. This results in a thick, aromatic gravy that is best complemented by the pulav. Pulav is a rich and fragrant rice cooked in ghee (clarified butter) along with fried onions and whole garam masalas. After lunch we had Kheer (rice pudding) for dessert and then slept off with happy stomachs!!


Recipe for Mutton Curry

1 Kg Mutton or Chicken (with bones)
For Marinate:
1/2 Cup Yogurt
2 Tbsp Lime juice
2 Tbsp Ginger Garlic paste
1 Tsp Turmeric Powder
For paste:
Fresh Grated Coconut (half of one coconut)
1/4 Cup Assorted Whole Garam Masala*
5-6 Green Chillies
1 Piece Ginger (2 inch)
4 Pods Garlic
2 Tsp Poppy seeds
4 Big Onions (sliced)
2 Tomatoes (chopped)
1 Potato (peeled and quartered)
1 Tsp Powdered garam masala
1 Cup Oil

Clean and wash the meat and ensure that it is dry. Apply yogurt, ginger garlic paste, Turmeric powder, salt and lime juice and keep aside.
In a pan, roast the coconut, whole garam masalas, poppy seeds and coriander seeds till the coconut is brown and the spices become fragrant. Cool this mixture and grind to a fine paste along with the chillies, coriander leaves, piece of ginger,the garlic pod and a little water to get a smooth paste and keep aside.
In a pressure cooker, heat the oil and fry the onions with the green chillies. Once the onion is golden brown, add the tomatoes and fry till it is soft. Add the mutton and mix well. Close the cooker lid and cook for four whistles or till cooked. Open the lid and mix well. Add the potato and the coconut paste and cook well till the potatoes are done. Add more water according to preferred consistency of the curry. Garnish with coriander leaves and serve.
*-Assorted garam masala includes Cardamom, Cinnamon, Cloves, Whole Black Pepper, Bay Leaf, Coriander Seeds. To make powdered garam masala roast the above in a dry pan and grind finely.


Pulav

2 Cups Basmati Rice (Washed and soaked)
4 Cups water
1 Onion
4 Tbsp Ghee
4 Cloves
1 Bay Leaf
1 Stick Cinnamon
4 Cardamom Pods

In a deep bottom vessel (preferably non-stick) heat the ghee. Add the garam masalas and onion and fry till golden brown. Add the rice and toast till slightly transparent. Add the water and cook till water boils. Once the water boils cover with lid and keep heat on low. Cook till all the water has evaporated and rice is done.

Happy Eating!!

Thursday, December 24, 2009

Peanut Butter Blossoms


I had been eyeing these cookies for so many days but didn't have the courage to make them (my past record with cookies has not been so great). But after seeing them pop up on many other sites coz of Christmas baking, I finally decided to give them a try and boy! Am I glad I did. The cookie is so delicate and yummy (if I may say so myself). I used the recipe from Joy of Baking but forgot the last step of rolling the dough in the sugar :)I used slightly salted butter and omitted the salt. Also, I liked the plain cookie rather than one with the chocolate (just a personal preference) but my hubby loved the one with the chocolate.
I also saw a twist on these on Annies Eats named Cappuccino Love Bites
So go ahead and take the plunge into these delicious cookies. You will be glad you listened to me!


Kisses all ready to be used


Recipe Source - Joy of Baking

Ingredients

1/2 cup (113 grams) unsalted butter, room temperature
3/4 cup (185 grams) peanut butter (smooth or crunchy)
1/3 cup (70 grams) light brown sugar
1/3 cup (65 grams) granulated white sugar
1 large egg
1 teaspoon vanilla essence
2 tablespoons milk
1 1/2 cups (210 grams) all purpose flour
1 teaspoon baking soda
1/2 teaspoon salt
Coating:
1/3 cup (65 grams) granulated white sugar

In a large mixing bowl cream the butter and peanut butter. Add the sugars, egg and milk and beat until light and fluffy (about 2 - 3 minutes). Add the vanilla essence and beat to combine. In a separate bowl whisk together the flour, baking soda, and salt. Add to the peanut butter mixture and beat until incorporated.
Preheat oven to 190 degrees C (375 degrees F) and place rack in the center of the oven.
Roll the batter into 1 inch (2.54) round balls. Place the granulated white sugar in a shallow bowl and roll each ball in the sugar. Place on the prepared baking sheet, spacing about 2 inches (5 cm) apart. While the cookies are baking remove the wrappers of the kisses and keep them ready for use.
Bake the cookies for about 10 minutes, or until the cookies are lightly browned. They will still be soft. Immediately upon removing the cookies from the oven, place a chocolate Kiss in the center of each cookie, pressing down until the cookie just starts to crack. Cool completely on a wire rack.

Makes 48 cookies.

Happy Eating!!

I LOVE HATE LOVE FOOD


I have a love - hate relationship with food. You see, I love eating. But I hate the mountain of calories that I have to deal with (or not) every time something goes down my throat (which is very often). Well this relationship started long ago thanks to my mother (who is a fantastic cook by the way) who would make yummylicious food for my family of seven. Our house would always smell amazing with rich aromas wafting through the air. My mom loves to cook and will make sure each dish is prepared lovingly with utmost care. I however do not have her patience but do love cooking (sometimes) and baking.

Often at night I start thinking about what I will bake next, whether I have all the ingredients or not and who will eat the big batch of cookies or cupcakes that I will make (of course I could eat them all by myself, hee hee). When we moved into our new place with a bigger kitchen (by big I mean comparatively to the previous one) the first thing I did was to get myself a baking corner. I bought all new cake pans, cute little measuring cups and spoons, a cookie sheet, muffin pan and even a Philips stand mixer. Of course my dreams are made of a Kitchen Aid (all red and shiny) standing proudly on my kitchen counter but (‘sigh’) I will have to make do with the Philips for now.

I know that I am still a baby in the world of baking having just skimmed the surface in the past two years. I do have a long way to go and I would love to take you with me through my journey. I will be trying Peanut Butter Blossoms this weekend and lets just hope I get post worthy results.

Happy Eating!!

LOVE