Showing posts with label Daring Bakers. Show all posts

Saturday, August 31, 2013

Daring Bakers August 2013 - Mawa Cake


This month our Daring Bakers host was Aparna of My Diverse Kitchen and she challenged us to make some amazing regional Indian desserts. The Mawa Cake, the Bolinhas de Coco cookies and the Masala cookies – beautifully spiced and delicious!

Due to time and calorie constraints I decided to only tackle the Mawa cake. The rich and fragrant cake was a favorite among all the tasters, especially Latif who is very picky about dessert.

According to Aparna, “Mawa Cakes are a specialty cake that is the hallmark of Irani cafés in India. The Iranis are Zoroastrians who left Persia/ Iran in the 19th and early 20th centuries to escape persecution of non-Muslims, and settled down and thrived here mostly in the cities of Mumbai, Hyderabad and Pune. They’re most famous in India for their friendly informal cafés/ restaurants that serve the most awesome food. The brun pav or maska pav(kinds of bread) with Irani chai (thick, strong, sweet and milky cardamom flavored tea), their Shrewsbury biscuits and Mawa cakes are but a few of them.
Mawa (also known as Khoya/ Khoa) is made by slowly reducing milk (usually full-fat) until all that remain is a mass of slightly caramelized granular dough-like milk solids. Mawa is used in a wide variety of Indian sweets like Gulab Jamun and Peda, to mention just two. Mawa is pronounced as Maa-vaa; Khoya is pronounced as KhOhyaa. “
While the cake is a cinch to make, the Mawa is time consuming and requires a lot of patience.  It took about 4 hours for my milk to completely reduce down to milk solids. Next time I will make the cake with ready made mawa that we can get in Indian mithai (sweet) shops.

Recipe Source - Aparna from My Diverse Kitchen

Ingredients
For The Mawa
1 liter (4 cups) Full Fat Milk
For The Cake
1/2 Cup (1 stick) (120 ml) (113 Gms) Unsalted Butter (soft at room temperature)
3/4 Cup (180 ml) Packed Crumbled Mawa
1-1/4 Cups (280 Gms) Castor Sugar
3 Large Eggs
1 ½ Tsp Cardamom Powder
2 Cups (260 Gms) Cake Flour 
1 Tsp (5 Gms) baking powder
1/4 Tsp Salt
1/2 Cup (120 ml) Milk
Cashew Nuts (or blanched almonds) to decorate (about 18 to 20)

Make The Mawa
1. First make the “Mawa”. Pour the milk into a heavy bottomed saucepan, preferably a non-stick one. Bring the milk to a boil, stirring it on and off, making sure it doesn’t stick to the bottom. Turn down the heat to medium and keep cooking the milk until reduces to about a quarter of its original volume. This should take about an hour to an hour and a half.
2. The important thing during this process is to watch the milk and stir it frequently to make sure it doesn't stick to the sides or bottom of the pan and get burnt. The danger of this happening increases as the milk reduces and gets thicker.
3. Once the milk it has reduced to about one fourth, 1/4 quantity, lower the heat to low and let cook for a little while longer. Keep stirring regularly, until the milk solids (mawa) take on a lumpy appearance. There should be no visible liquid left in the pan, but the mawa should be moist and not stick to the sides of the pan.
4. Remove the pan from heat and transfer the mawa to a bowl and let it cool completely. Then cover and refrigerate it for a day or two (not more) till you’re ready to make the cake. It will harden in the fridge so let it come to room temperature before using it. You should get about 3/4 to 1 cup of mawa from 1 liter (4 cups) of full-fat milk.

Bake The Cake
1. Now start preparations for the cake by pre-heating your oven to moderate 180°C/350°F/gas mark 4. Beat the butter, the crumbled mawa and the sugar in a largish bowl, using a hand held electric beater, on high speed until soft and fluffy.
2.  Add the eggs, one at a time, and beat on medium speed till well incorporated. Add the vanilla and milk and beat till mixed well.
3. Sift the cake flour, baking powder, cardamom, and salt onto the batter and beat at medium speed and well blended. If you cannot find cake flour, place 2 tablespoon of cornstarch in the bottom of your 1-cup measure and then fill it with all-purpose (plain) flour to make up to 1 cup.
4. Grease and line only the bottom of an 8 inch (20 cm) spring form pan. Pour the batter into this and lightly smooth the top. Place the cashew nuts (or blanched almonds) on top of the batter randomly. Do not press the nuts down into the batter. A Mawa Cake always has a rustic finished look rather than a decorated look.
5. Bake in a preheated moderate oven for about 1 hour until the cake is a golden brown and a skewer pushed into the center comes out clean. Do not over bake the cake or it will dry out. If the cake seems to be browning too quickly, cover it with aluminum foil hallway through the baking time.
6. Remove from oven and allow it to cool for 10 min in the tin. Release the cake, peel off the parchment from the base and let it cool completely. 

Happy Eating!!

Sunday, July 28, 2013

July 2013 Daring Bakers - Moo Shu Chicken


Has it really been 6 months since my last post? Wow, that is a real long time and I am entirely to blame for this. I have neglected this space all this while and now I need to make up for it. And in order to do that, I bring you this fabulous Moo Shu chicken. How can Moo Shu chicken be a daring bakers callenge you ask? Let me explain. This month our challenge was to take any past Daring Bakers or Daring Cooks challenge that we wanted to try and complete it. With a million things to choose from I decided on something that would double up as dinner. Win-Win!


This dish is incredibly easy to make and all the ingredients are also readily available. Ofcourse, I did swap out a thing or two but that is the beauty of this dish. The pancakes do take some time to make but you could substitute store bought chapatis or tortillas if you are in a rush.

Let's make some Moo Shu!

Recipe - Makes a lot! I did not use the quantities specified below, just scaled them to our requirements.

Ingredients
For the pancakes
4 Cups All purpose Flour (I used whole wheat Atta)
1 1/2 Cup Boiling Water
1 Tsp Vegetable Oil

For the Moo Shu Chicken
2 Cups Thinly sliced Mushrooms
4 Cups Thinly sliced Cabbage
500 Grams Chicken Breast (Boneless and Skinless) - Marinate in pinch of salt and 1 Tsp Ginger garlic paste for 1 Hour
4 Large Eggs
4 Scallions
2 Tbsp Soy Sauce
1 Tbsp Vinegar
2 Tbsp Vegetable Oil  (Divided)
2 Tsp Sesame Oil
Salt to Taste
Pepper

For the Hoisin Sauce
4 Tbsp Soy Sauce
2 Tbsp Peanut Butter
1 Tbsp Honey
2 Tsp Vinegar
1/8 Tsp Garlic Powder
2 Tsp Sesame Oil
20 drops Chinese Style Hot Sauce
Pinch of pepper

Make the Pancakes
1. Sift the flour into a mixing bowl. Gently pour in the water, stirring as you pour, then stir in the oil. Knead the mixture into a soft but firm dough. If your dough is dry, add more water, one tablespoon at a time, to reach the right consistency. Cover with a damp towel and let stand for about 30 minutes.
2. Lightly dust the surface of a worktop with dry flour. Knead the dough for 6 - 8 minutes or until smooth, then divide into 3 equal portions. Roll out each portion into a long sausage and cut each sausage into 8 - 10 pieces. Keep the dough that you are not actively working with covered with a lightly damp dish cloth to keep it from drying out.
3. Roll each piece into a ball, then, using the palm of your hand, press each piece into a flat pancake. Dust the worktop with more dry flour. Flatten each pancake into a 6 to 8 inch (15 cm to 20 cm) circle with a rolling pin, rolling gently on both sides.
4. Place an un-greased frying pan over high heat. Once the pan is hot, lower the heat to low and place the pancakes, one at a time, in the pan. Remove when little light brown spots appear on the underside. Cover with a damp cloth until ready to serve.

Make The Chicken
1. Lightly beat the eggs with a pinch of salt.
2. Heat about 1 tablespoon (15 ml) vegetable oil in a preheated wok and scramble the eggs until set, but not too hard. Remove and keep to one side.
3. Heat 1 Tbsp vegetable oil. Stir fry the marinated chicken till no longer pink in the middle. Remove to a plate and shred finely.
4. In the wok, add the mushrooms and cabbage. Stir fry for about 2 - 3 minutes, then add the remaining salt, pepper, soy sauce and vinegar. Blend well and continue stirring for another 2 minutes.
5. Add the scrambled eggs, stirring to break them  into small bits. Add the sesame oil and blend well. Add the chicken and heat through.

Make the Sauce
Mix all the ingredients in a bowl till well blended.

Serve 
Place about 2 tablespoons (30 ml) of hot Moo Shu in the center of a warm pancake, add one Tsp sauce and roll it into a parcel with the bottom end turned up to prevent the contents from falling out. Eat with your
fingers.

Happy Eating!!

Sunday, December 30, 2012

Daring Bakers December 2012 - Panettone


This month we had a new bread to make as part of our DB challenge and I loved the sweet, rich bread. Though I didn't make it the traditional way with the candied fruit, my version with chocolate and nuts got happy responses from all my colleagues.

Blog Checking Lines: The December 2012 Daring Bakers’ challenge was hosted by the talented Marcellina of Marcellina in Cucina. Marcellina challenged us to create our own custom Panettone, a traditional Italian holiday bread!

Recipe 
Special Equipment - One panettone paper or pan. I used a 7 inch round cake pan and attached a collar using parchment paper on the inside. I used butter to stick the paper to the sides and stapled the edges together.

Ingredients - Makes one 7 inch Panettone

Sponge
1 Tsp Instant Yeast
40 ml Warm Water
1/4 Cup (35 gms) Unbleached All Purpose Flour

First Dough 
1 Tsp Instant Yeast
1 1/2 Tbsp Warm Water
1 Large Egg (At room temperature)
1/2 Cup + 2 Tbsp (87.5 gms) Unbleached All Purpose Flour
2 Tbsp Sugar
1/4 Cup (1/2 stick/57.5 gms) Unsalted Butter (At room temperature)

Second dough
1 Large Egg
2 Medium Egg Yolks
5 Tbsp (75 Gms) Sugar
1 1/2 Tbsp Honey
2 Tbsp Vanilla Essence
1/2 Tsp Salt
1/2 Cup (1 Stick/113 Gms) Unsalted Butter (At room temperature)
1 1/2 Cups (210 Gms) Unbleached All Purpose Flour plus up to (1/3 cup) for kneading
Grated zest of 1 orange

Filling and final dough 
100 Gms Lindt Orange Intense Chocolate Bar
1 Cup Milk Chocolate Chips
1 Cup Chopped Walnuts/Pecans

Make the Sponge
1. Mix the yeast and water in a small bowl.
2. Mix in the flour.
3. Cover with plastic wrap and allow to double in size for about 20 to 30 minutes .

Make The First Dough
1. In the mixer bowl, mix together the yeast and water.
2. With the paddle attached mix in the sponge, eggs, flour, and sugar.
3. Add in the butter and mix for 3 minutes until the dough is smooth and even.
4. Cover with plastic wrap and allow double in size, about 1 – 1 ¼ hours.

Make The Second dough
1. With the paddle mix in thoroughly the eggs, egg yolks, sugar, honey, vanilla, orange zest and salt.
2. Mix in the butter until smooth.
3. Add the flour and slowly incorporate.
4. At this stage the dough will seem a little too soft, like cookie dough.
5. Replace the paddle with the dough hook and knead for about 2 minutes.
6. Turn out the dough and knead it on a well-floured surface until it sort of holds its shape.
7. Don’t knead in too much flour but you may need as much as 2/3 cup (100 gm). Be careful the excess flour will affect the finished product.

First Rise
1. Oil a large bowl lightly, plop in your dough and cover with plastic wrap.
2. Now we need to let it rise until it has tripled in size. There are two ways to go about this.
Rise in a warm place for 2 – 4 hours.
Or find a cool spot (64°F -68°F) (18°C – 20°C) and rise overnight.
Or rise for 2 hours on your kitchen bench then slow the rise down and place in the refrigerator overnight. I placed my bowl on the kitchen counter as we have central A/C and it rose perfectly.

Filling and Final Rise
1. Place a large piece of parchment on the counter and press out the dough onto an oval shape.
2. Sprinkle over half of the filling and roll up the dough into a log
3. Press out again into an oval shape and sprinkle over the remaining of the filling
4. Roll into a log shape again.
5. Shape into a ball and slip into your prepared pans, panettone papers or homemade panettone papers. (I rolled the parchment paper into a cylinder and used it to slip the dough in my prepared pan.)
6. Cut an X into the top of the panettone and allow to double in size.
7. Rising time will vary according to method of first rise. If it has been in the refrigerator it could take 4 hours or more. If it has been rising on the kitchen bench in a warm place it should be doubled in about 2
hours.

Bake The Panettone 
1. When you think your dough has only about 30 minutes left to rise preheat your oven to moderately hot 400°F/200°C/gas mark 6 and adjust your oven racks
2. Just before baking carefully (don’t deflate it!) cut the X into the dough again and place in a knob (a nut) of butter.
3. Place your panettoni in the oven and bake for 10 minutes.
4. Reduce the heat to moderate 350°F/180°C/gas mark 4 and bake for another 10 minutes
5. Reduce the heat again to moderate 325°F/160°C/gas mark 3 and bake for 30 minutes until the tops are well browned and a skewer inserted into the panettone comes out clean.
6. Cooling your panettone is also important. If you have use papers (commercial or homemade) lie your panettoni on their side cushioned with rolled up towels. Turn gently as they cool. If you have used pans
cool in the pans for 30 minutes then remove and cushion with towels as above.

Happy Eating!!

Wednesday, November 28, 2012

Daring Bakers Nov 2012 - Chocolate Cheesecake Bars


These cheesecake bars are the result of a kitchen disaster. It all started out with Peta of Peta Eats challenging us to make a celebration cookie, square or bar for this months Daring Bakers challenge. She provided us with 12 recipes and I chose the Chocolate and Caramel Turtle Bars as they looked really yum.

Unfortunately for me, I didn't cook my caramel layer for the bars properly and all I had in the end was a big buttery mess. I didn't want to throw all those good ingredients so I reached out to Peta asking her how I could re purpose my failed bars. She gave me the brilliant idea to crush them up and use as a cheesecake base. I took this idea and made a two layer cheesecake bar. The bottom layer is nutty, chocolatey and dark while the top layer is smooth, sweet and silky. What a fabulous result!

Recipe Source - Adapted from Peta of Peta Eats and Annie's Eats

Ingredients
For The Crust (My crust was the failed turtle bar but I have given a recipe below to imitate the flavour)
1 Cup Pecans or Walnuts
2 Cups Crushed Digestive Biscuits or Graham Crackers
100 Gms Dark Chocolate
1 Cup Brown Sugar
1/2 Cup Melted Butter

For The Cheesecake Layer
8 Oz Cream Cheese (At room temperature)
4 Tbsp Sugar
4 Tbsp Plain Yogurt or Sour Cream
1 Large Egg
1/2 Tsp Vanilla Essence
A pinch of salt

1. Preheat the oven to 325 Degree F (162 Degree C). Line a 9 X 3 inch rectangle pan or 8 X 8 inch square pan with foil overhanging from the sides.
Make The Crust
1. Place the nuts in the bowl of a food processor and pulse until the nuts until finely chopped. Add the biscuit crumbs, chocolate and sugar and process till the chocolate is broken into smaller bits. Add the butter and pulse till combined.
2. Transfer the mixture to the prepared pan and spread evenly. Bake for 10 minutes. Remove from oven and set aside. Leave the oven on at the same temperature.
Make The Filling
1. In the bowl of an electric mixer fitted with paddle attachment, add the cream cheese and beat on medium high for 2 minutes till smooth.
2. Add the sugar and beat till well combined.
3. Add the yogurt/sour cream, vanilla and salt. Beat till combined.
4. Beat in the egg till well combined.
Assemble and Bake
1. Pour the cheesecake batter on the crust and level with an offset spatula.
2. Place in the middle rack of the oven and bake for 30 - 35 minutes till the edges are browned and the center is slightly wobbly.
3. Remove from oven and cool completely on a wire rack. Cover with plastic wrap and place in fridge for 3 hours. Cut into bars and serve. Store covered in fridge.

Happy Eating!

Friday, April 27, 2012

Daring Bakers April 2012 Armenian Nutmeg Cake


Armenian Nutmeg Cake.. sounds fancy right? This cake is a twist on the traditional coffee cake with the addition of fresh nutmeg which gives it an interesting flavor. It is simply wonderful and I have already made it twice this month.

Blog Checking Lines - The Daring Bakers' April 2012 challenge, hosted by Jason at Daily Candor, were two Armenian standards: nazook and nutmeg cake. Nazook is a layered yeasted dough pastry  with a sweet filling, and nutmeg cake is a nutty, fragrant coffee style cake.


While I didn't make the nazook this month I did make the cake twice and it was quickly gobbled up both the times. The pictured cake is a 6 inch one as I halved the recipe when I made it the second time. Latif polished off four slices coz he couldn't wait for dinner anymore!

Recipe Source - Adapted from The Commonsense Cookery Book

Ingredients - Makes one 9 inch cake

1 Cup (240 ml) Milk
1 Tsp Baking Soda
2 Cups All Purpose Flour
2 Tsps Baking Powder
2 Cups Brown Sugar (Firmly Packed)
1 1/2 Sticks (180 ml) (170 gm/6 oz) Unsalted Butter (cubed)
1/2 Cup Walnut pieces (I also used pistachios and almonds)
1/2 Tsp Freshly Grated Nutmeg
1/2 Tsp Cinnamon Powder
1 Egg

1. Pre heat the oven to 175 Degrees C (350 Degree F). Have ready a 9 inch round pan.
2. Place the flour, baking powder and brown sugar in a bowl and whisk to mix evenly. Toss in the butter cubes and crumble the mixture with your fingers. It should resemble coarse breadcrumbs.
3. Take two cups of the mixture and press it evenly in the bottom of the cake pan to form the crust.
4. Mix the baking soda to the milk and keep aside.
5. Add the egg to the remaining cake mixture and mix well.
6. Add the milk, nutmeg and cinnamon powder. Mix well. The batter should be a little lumpy.
7. Pout the batter over the prepared crust in the pan. Scatter the nuts on top and place in the oven,
8. Bake for 35 - 40 minutes till a toothpick inserted in the centre comes out clean. Let it cool in the pan on a wire rack and then invert on a serving plate. Have a slice and enjoy!

Happy Eating!! 

Wednesday, March 28, 2012

Daring Bakers March 2012 - Dutch Crunch Bread


This month we visited the zoo to see all the wild animals like tigers, giraffes and zebras! Not really, but if you see all the wonderful results of the challenge you will surely think so too.

Blog Checking Lines : Sara and Erica of Baking JDs were our March 2012 Daring Baker hostesses! Sara & Erica challenged us to make Dutch Crunch bread, a delicious sandwich bread with a unique, crunchy topping. Sara and Erica also challenged us to create a one of a kind sandwich with our bread!

Though I did make the bread I couldn't make a sandwich as I was really pressed for time and we had them as dinner rolls. The recipe is very easy and within two hours you can have fresh baked bread out of the oven.

Recipe Source -  The recipe for the Dutch Crunch topping came from Rose Levy Beranbaum’s The Bread Bible. The recipes for the breads we’ve suggested came from The Bread Bible and an adaptation of a recipe found on Bakingbites.com

Check out the Daring Bakers website for the recipe!

Happy Eating!!

Thursday, March 1, 2012

Chocolate Marble Bread


This is the second bread I made as a part of the February Daring Bakers Challenge. The method for both the breads is exactly the same and it is a very easy recipe. However, my cake turned out a bit dry and that could be because I baked it a bit too long. I have given the link to the recipe below from Joy of Baking.

Recipe - Joy of Baking

Happy Eating!!

Monday, February 27, 2012

Daring Bakers February 2012 - Pineapple Loaf Cake


Up until the beginning of this month I had no idea what a quick bread was. So when I saw the title for the challenge I assumed we were going to make some type of bread. Then when I saw the recipe I thought, "hmm, this is a cake recipe..." I was really confused on the whole quick bread thing and hopped on to google to get some answers. So, what I have learnt so far is that a quick bread has a distinctive method of mixing ingredients and does not use any leaveners like yeast to raise the baked goods.


Blog-checking lines: The Daring Bakers’ February 2012 host was – Lis! Lis stepped in last minute and challenged us to create a quick bread we could call our own. She supplied us with a base recipe and shared some recipes she loves from various websites and encouraged us to build upon them and create new flavor profiles.

Though we were asked to make our own flavors I was hesitant to try anything of my own. I tried two recipes from the net and both were good. I thought the pineapple loaf would be a bit of a problem based on the reviews but that was the recipe that got rave reviews from my tasters.

Recipe Source - Slightly adapted from the Coconut - Pineapple Loaf Cake from Martha Stewart

Ingredients - I have reduced the recipe quantity from the original to fit my loaf pan.

2/3 Cup Sweetened Shredded Coconut
2/3 Stick (approx 80 Gms) Unsalted Butter (at room temperature)
1 Cup All Purpose Flour
1/4 Tsp + 1/8 Tsp Baking Soda
1/4 Tsp + 1/8 Tsp Salt
2/3 Cup Sugar
2 Large Eggs
2/3 Cup Thick Yogurt
6 Pineapple Rings (from a can - Drained and Chopped finely)

Note - Make sure the pineapple is really well drained. Place it on multiple sheets of kitchen towels to remove as much moisture as possible.
  1. Preheat oven to 350 degrees F. Butter and flour a 9-by-5-inch (8-cup) loaf pan; set aside.
  2. In a medium bowl, whisk together flour, baking soda, and salt; set aside.
  3. Using an electric mixer on high speed, beat butter and sugar until light and fluffy.
  4. Add eggs, one at a time, beating well after each addition.
  5. Reduce speed to low, and alternately add flour mixture in three parts and sour cream in two, beginning and ending with flour mixture. Mix just until combined (do not overmix).
  6. Using a rubber spatula, fold pineapple and coconut into batter. Spoon into prepared pan, and smooth top.
  7. Bake until a toothpick inserted in center comes out clean, approx 60 minutes. Let cake cool in pan 15 minutes. Remove from pan, and transfer to a wire rack to cool completely.
Happy Eating!!

Saturday, January 28, 2012

Daring Bakers January 2012 - Scones


This months Daring Bakers challenge was a simple yet tricky challenge. While the scones looked easy to make and had staple ingredients the technique was anything but easy. To get perfect flaky scones one has to knead the dough for the right time and with the right pressure. 

Due to time constraints I could make only one batch and they were quite good for a first timer. They were delicious hot out of the oven with some jam.   

Recipe Source: The challenge scone (biscuit) recipe has been especially formulated by Audax Artifex after a large amount of research and experimentation. It is designed to help you master the techniques involved in making scones (biscuits) exactly the way you like them.  
Blog-checking lines: Audax Artifex was our January 2012 Daring Bakers’ host. Audax worked tirelessly to master light and fluffy scones (a/k/a biscuits) to help us create delicious and perfect batches in our own kitchens!   

Ingredients

1 Cup (240 ml) (140 gm/5 oz) Plain (all-purpose) Flour 
2 Tsp (10 ml) (10 gm) (1/3 oz) Fresh Baking Powder 
1/4 Tsp (1¼ ml) (1½ gm) Salt 
2 Tbsp (30 gm/1 oz) Frozen Grated Butter (or a combination of lard and butter) 
Approximately 1/2 Cup (120 ml) Cold Milk
Optional 1 tablespoon milk, for glazing the tops of the scones
      
1. Preheat oven to very hot 475°F/240°C/gas mark 9. 
2. Triple sift the dry ingredients into a large bowl. (If your room temperature is very hot refrigerate the sifted ingredients until cold.) 
3. Rub the frozen grated butter (or combination of fats) into the dry ingredients until it resembles very coarse bread crumbs with some pea-sized pieces if you want flaky scones or until it resembles coarse beach sand if you want tender scones. 
4. Add nearly all of the liquid at once into the rubbed-in flour/fat mixture and mix until it just forms a sticky dough (add the remaining liquid if needed). The wetter the dough the lighter the scones (biscuits) will be! 
5. Turn the dough out onto a lightly floured board, lightly flour the top of the dough. To achieve an even homogeneous crumb to your scones knead very gently about 4 or 5 times (do not press too firmly) the dough until it is smooth. To achieve a layered effect in your scones knead very gently once (do not press too firmly) then fold and turn the kneaded dough about 3 or 4 times until the dough has formed a smooth texture. (Use a floured plastic scraper to help you knead and/or fold and turn the dough if you wish.) 
6. Pat or roll out the dough into a 6 inch by 4 inch rectangle by about ¾ inch thick (15¼ cm by 10 cm by 2 cm thick). Using a well-floured 2-inch (5 cm) scone cutter (biscuit cutter), stamp out without twisting six 2-inch (5 cm) rounds, gently reform the scraps into another ¾ inch (2 cm) layer and cut two more scones (these two scones will not raise as well as the others since the extra handling will slightly toughen the dough). Or use a well-floured sharp knife to form squares or wedges as you desire. 
7. Place the rounds just touching on a baking dish if you wish to have soft-sided scones or place the rounds spaced widely apart on the baking dish if you wish to have crisp-sided scones. Glaze the tops with milk if you want a golden colour on your scones or lightly flour if you want a more traditional look to your scones. 
8. Bake in the preheated very hot oven for about 10 minutes (check at 8 minutes since home ovens at these high temperatures are very unreliable) until the scones are well risen and are lightly coloured on the tops. The scones are ready when the sides are set. 
9. Immediately place onto cooling rack to stop the cooking process, serve while still warm.   

Happy Eating!!

Thursday, October 27, 2011

Daring Bakers - October 2011 - Povitica!!!


I have been so lost lately. Its been a long time since I actually did something productive (except at work mind you) and after skipping so many daring bakers challenges I really wanted to get up and do something. So that is exactly what I did the moment I saw the challenge go up on the first of the month. Yup, that's right, I was one of the first ones to complete the challenge (after Audax of course) and I had a great time making this.

Povitica (pronounced po-va-teet-sa) is traditional Eastern European dessert bread that is traditionally served during the holiday season. This was really a big challenge for me as it was a completely new type of bread and the dough was sooo tough to work with. The problem was that  the gluten was not rested enough and so the dough was not stretching out. Wish I had known that before I started making it! Anyways, I did get good results and had an amazing loaf of sweet bread, The filling is fantastic. I actually ate toasted slices of the bread for breakfast each day! Yum! I would definitely make this again and even try savoury fillings as some of the other daring bakers.

The recipe is a long one with at least 30 steps but it is not difficult. The only challenging part is rolling out the dough which should not be a problem if your dough is rested. I made only a quarter of the recipe and this is enough for one loaf.

Blog-checking lines: The Daring Baker’s October 2011 challenge was Povitica, hosted by Jenni of The Gingered Whisk. Povitica is a traditional Eastern European Dessert Bread that is as lovely to look at as it is to eat!

Recipe here...

Wednesday, July 27, 2011

Daring Bakers July 2011 - Mango Fraisier


Blog Checking Lines - Jana of Cherry Tea Cakes was our July Daring Bakers’ host and she challenged us to make Fresh Frasiers inspired by recipes written by Elisabeth M. Prueitt and Chad Robertson in the beautiful cookbook Tartine.


I love making new desserts and that is one of the main reasons that I joined Daring Bakers. This Fraisier for example is something I would have never made or eaten if not for this challenge. I originally wanted to make the classic version with strawberries but since strawberries are not native to this place they are very expensive and even after paying so much I will never get plump, ripe strawberries. So I decided to go with  mangoes and I can say that it was a great pairing. Though I must say that Alphonso Mangoes would be simply stunning in this dessert. I am very picky when eating mangoes and eat only a few varieties. For this cake I used a Pakistani variety and it was a little too sweet for me. Next time I will surely use Alphonso or something similar.


It was great fun making the chiffon cake and everything went smoothly. I got a perfect cake even though I baked it in a regular 9 inch cake pan. I couldn't find the bottom of my spring form pan and was scared that the cake would not turn out well. To support the sides of the cake pan I attached my spring form ring to the upper edge of my cake pan. That gave good height to the pan and the cake rose very well.

I must confess here that I was not very happy with the whole process of making the pastry cream. It was too long and in the end it didn't even taste like pastry cream but more like whipped cream (very delicious though!). I am not sure if it is supposed to taste like that or not. Next time I will try another simpler recipe.

The whole thing took me about 4 hours to complete from start to finish, though each component can be made separately and stored in the fridge for assembly later on.

I decided not to use the almond paste layer as the fruit, cake and cream were already too sweet. I added some cocoa powder and grated dark chocolate to balance the sweetness in the dessert. Latif loved the dessert and gobbled an entire piece in seconds!

Recipe
Ingredients

For The Basic Chiffon Cake
1 cup + 2 tablespoons (155 gm) All-purpose Flour
1 Tsp (4 gm) Baking Powder
3/4 Cups (170 Gms) Sugar
1/2 Tsp Salt
1/4 Cup Vegetable Oil
3 Large Egg Yolks
1/4 Cup + 1 tablespoon Water
1 Tsp (5 ml) Vanilla Essence
3/4 Tsp Grated Lemon Zest
5 Large Egg Whites
1/4 Tsp Cream of Tarter

For the Simple Syrup
1/3 cup Sugar
1/3 cup Water


For The Pastry Cream Filling
1 Cup Whole Milk 
1/2 Tsp Vanilla Essence 
1/8 Tsp Salt
2 Tbsp Cornflour (Cornstarch in U.S)
1/4 Cup Sugar
1 Large Egg
2 Tbsp Unsalted Butter
3/4 Tsp Gelatin
1/2 Tbsp Water
1 Cup Heavy Cream


Make the Chiffon Cake
1. Preheat the oven to moderate 325°F (160°C/gas mark 3).
2. Line the bottom of an 9-inch spring form pan with parchment paper. Do not grease the sides of the pan. (I used a regular cake pan and attached the spring form ring to it)
3. In a large mixing bowl, stir together the flour and baking powder. Add in all but 3 tablespoons (45 ml.) of sugar, and all of the salt. Stir to combine.
4. In a small bowl combine the oil, egg yolks, water, vanilla and lemon zest. Whisk thoroughly.
5. Combine with the dry ingredients and mix thoroughly for about one minute, or until very smooth.
6. Put the egg whites into a stand mixer, and beat on medium speed using a whisk attachment on a medium speed, until frothy. Add cream of tartar and beat on a medium speed until the whites hold soft peaks. Slowly add the remaining sugar and beat on a medium-high speed until the whites hold firm and form shiny peaks.
7. Using a grease free rubber spatula, scoop about ⅓ of the whites into the yolk mixture and fold in gently. Gently fold in the remaining whites just until combined.
8. Pour the batter into the prepared pan. Bake for 45 to 55 minutes or until toothpick inserted into the center comes out clean.
9. Removed the cake from the oven and allow to cool in the pan on a wire rack.
10. To unmold, run a knife around the sides to loosen the cake from the pan and remove the spring form sides. Invert the cake and peel off the parchment paper. Refrigerate for up to four days.

Make The Simple Syrup 
1. Combine the water and sugar in a medium saucepan.
2. Bring the mixture to a boil and let the sugar dissolve. Stirring is not necessary, but will not harm the syrup.
3. Remove the syrup from the heat and cool slightly.
4. Transfer syrup to a lidded container or jar that can be stored in the refrigerator. Simple syrup can be stored for up to one month.

Make the Pastry Cream
1. Pour the milk, vanilla, and salt into a heavy sauce pan. Place over medium-high heat and scald, bringing it to a near boiling point. Stir occasionally.
2. Meanwhile, in a stand mixer add the cornstarch and sugar. Whisk to combine
3. Add the eggs to the sugar and cornstarch and whisk until smooth.
4. When the milk is ready, gently and slowly while the stand mixer is whisking, pour the heated milk down the side of the bowl into the egg mixture.
5. Pour the mixture back into the warm pot and continue to cook over a medium heat until the custard is thick, just about to boil and coats the back of a spoon.
6. Remove from heat and pass through a fine mesh sieve into a large mixing bowl. Allow to cool for ten minutes stirring occasionally.
7. Cut the butter into four pieces and whisk into the pastry cream a piece at a time until smooth.
8. Cover the cream with plastic wrap, pressing the plastic wrap onto the top of the cream to prevent a skin from forming. Chill in the refrigerator for up to five days.
9. In a small dish, sprinkle the gelatin over the water and let stand for a few minutes to soften.
10. Put two inches (55 mm) of water into a small sauce pan and bring to a simmer over a medium heat.
11. Measure 1/4 cup (2 oz/60 ml) of the chilled pastry cream into a small stainless steel bowl that will sit across the sauce pan with the simmering water, without touching the water.
12. Heat the cream until it is 120 F (48.8 C). Add the gelatin and whisk until smooth. Remove from the water bath, and whisk the remaining cold pastry cream in to incorporate in two batches.
13. In a stand mixer, fitted with the whisk attachment, whip the cream until it holds medium-stiff peaks. Immediately fold the whipped cream into the pastry cream with a rubber spatula.

For Fraisier Assembly
Components
1 Baked 9 inch Chiffon Cake
1 Recipe Pastry Cream Filling
1/3 Cup Simple Syrup
4 Large Alphonso Mangoes (Peeled and Sliced - 1/2 inch thick and 4 inch long)
Cocoa Powder For Dusting
Chocolate Curls for Decoration

1. Line the sides of a 9-inch spring form pan with plastic wrap. Do not line the bottom of the pan.
2. Cut the cake in half horizontally to form two layers.
3. Fit the bottom layer into the prepared spring form pan. Moisten the layer evenly with the simple syrup. When the cake has absorbed enough syrup to resemble a squishy sponge, you have enough.
4. Arrange the mango slices around the sides of the cake pan.
5. Place 1 Cup of cream in the center and using an offset spatula push it against the mangoes in the side and spread a thin layer across the top of the cake.
6. Chop the remaining mango pieces (reserve few for decoration) (use all the flesh from the seed) and spread it on the cream. Cover the mangoes entirely with the all but 1/4 Cup of the pastry cream.
7. Place the second cake layer on top and moisten with the simple syrup.
8. Spread the remaining 1/4 Cup of pastry cream on the top of the cake and lightly dust with cocoa powder. Decorate with chocolate curls and mango slices as desired.
9. Cover with plastic wrap and refrigerate for at least 4 hours.
10. To serve release the sides of the spring form pan and peel away the plastic wrap.
11. Serve immediately or store in the refrigerator for up to 3 days.

Happy Eating!! 

Friday, July 1, 2011

Bake Me Some Baklava


O.K. I know I have been missing for a long time from here but I do have some pretty good excuses. An operation, a house move, some house guests and an additional role at work have all kept me very, very busy the past few months. But now that I am recovered (almost) and settled in my new home (again, almost!) I have decided to pay more attention to my blog. This is a fantastic new dish that I tried, which is also the last thing that I baked in my old house (I love you my old kitchen, you will always be my first love!)

Erica of Erica’s Edibles was our host for the Daring Baker’s June challenge. Erica challenged us to be truly DARING by making homemade phyllo dough and then to use that homemade dough to make Baklava.

After missing the last two daring bakers challenges I was determined to at least attempt this one. I must say that I absolutely LOVE baklava. And I have eaten my fair share of it here in the middle east. Give me a box and I can polish it off entirely by myself (I have been known to have self control issues). So I was really excited to try making it myself. Because I could not stand on my feet for long after my operation, I knew rolling and kneading copious amounts of dough was out of the question. So I had to resort to store bought phyllo. Boy oh Boy! Did the dough give me a tough time! This was the first time I ever made Baklava or handled the store bought dough. The sheets just would not separate easily and I almost had a patchwork of sheets in my baking tray. But the end result was well worth the time and energy spent on it.

Most of this baklava was eaten by Latifs friends and one of them said that it was irresistible! Ah , music to a bakers ears! Before making the baklava I watched Alton Browns video from the Good Eats show and I I fell in love with that guy. He is so funny and explains so many things about the dish. As I did not make the phyllo from scratch I mixed and matched the given challenge recipe with Alton Browns recipe.

Check the Daring Bakers Website for the recipe and don't miss the great video of Alton Brown making baklava.
Switched On Baklava Part I
Switched On Baklava Part II

Happy Eating!!

Sunday, March 27, 2011

Daring Bakers March 2011 - Yeasted Meringue Coffee Cake

So, my last post was on March 1st and today is the 27th. And I don't even have a freakin picture to go with my post!! What happened to me??? I have been so busy at work and home lately that my baking has taken a backseat and I am almost ashamed to admit it but I am really lazy to take pics of the stuff I do manage to make. Case in point was the yeasted coffee cake I made for this months daring baker's challenge.

Blog-checking lines: The March 2011 Daring Baker’s Challenge was hosted by Ria of Ria’s Collection and Jamie of Life’s a Feast. Ria and Jamie challenged The Daring Bakers to bake a yeasted Meringue Coffee Cake.

This was a new type of cake for me to try and even though my results where not that great (I baked mine for a little too long) I could totally see that it was a yummy recipe. Unfortunately I didn't take a picture and the whole thing was finished in a day! I made only one wreath as I had halved the recipe and it was more than enough for the two of us. I whipped up a fabulous meringue (my egg whites where so stiff and shiny!!) and added lots of cinnamon and chocolate and loved everything about it. (I made Jamie's version). I wanted to make one more to photograph it but didn't get the time. One thing I would change the next time though would be the shape as I struggled to get a nice wreath shape and mine looked all flat and weird. Probably a loaf or something. I will leave you with the recipe as given to us and prepare for my next challenge. Which I will surely photograph!

Ingredients

For The Yeast Coffee Cake Dough
4 Cups (600 g / 1.5 lbs.) Flour
1/4 Cup (55 g / 2 oz.) Sugar
3/4 Tsp (5 g / ¼ oz.) Salt
1 Packet (2 ¼ teaspoons / 7 g / less than an ounce) Active Dried Yeast
3/4 Cup (180 ml / 6 fl. oz.) Whole Milk
1/4 Cup (60 ml / 2 fl. oz. Water (doesn’t matter what temperature)
1/2 Cup (135 g / 4.75 oz.) Unsalted Butter (Room Temperature)
2 Large Eggs (Room Temperature)
For The Meringue
3 Large Egg Whites (Room Temperature)
1/4 Tsp Salt
1/2 Tsp Vanilla
1/2 Cup (110 g / 4 oz.) Sugar

For The Filling
1 Cup (110 g / 4 oz.) Chopped Pecans or Walnuts
2 Tbsp Granulated Sugar (30 g / 1 oz.)
1/4 Tsp Ground Cinnamon - I used 1 Tsp
1 Cup (170 g / 6 oz.) Semisweet Chocolate Chips or Coarsely Chopped Chocolate
For The Egg Wash
1 Beaten Egg

Prepare The Dough
1. In a large mixing bowl, combine 1 ½ cups (230 g) of the flour, the sugar, salt and yeast.
2. In a saucepan, combine the milk, water and butter and heat over medium heat until warm and the butter is just melted.
3. With an electric mixer on low speed, gradually add the warm liquid to the flour/yeast mixture, beating until well blended. Increase mixer speed to medium and beat 2 minutes. Add the eggs and 1 cup (150 g) flour and beat for 2 more minutes.
4. Using a wooden spoon, stir in enough of the remaining flour to make a dough that holds together. Turn out onto a floured surface (use any of the 1 ½ cups of flour remaining) and knead the dough for 8 to 10 minutes until the dough is soft, smooth, sexy and elastic, keeping the work surface floured and adding extra flour as needed.
5. Place the dough in a lightly greased (I use vegetable oil) bowl, turning to coat all sides. Cover the bowl with plastic wrap and a kitchen towel and let rise until double in bulk, 45 – 60 minutes. The rising time will depend on the type of yeast you use.

Prepare Your Filling
1. In a small bowl, combine the cinnamon, nuts, chocolate and sugar for the filling.
 
Make The Meringue (Once the dough has doubled)
1. In a clean mixing bowl – ideally a plastic or metal bowl so the egg whites adhere to the side (they slip on glass) and you don’t end up with liquid remaining in the bottom – beat the egg whites with the salt, first on low speed for 30 seconds, then increase to high and continue beating until foamy and opaque. Add the vanilla then start adding the ½ cup sugar, a tablespoon at a time as you beat, until very stiff, glossy peaks form.

Assemble The Coffee Cakes
1. Line 2 baking/cookie sheets with parchment paper.
2. Punch down the dough and divide in half. On a lightly floured surface, working one piece of the dough at a time (keep the other half of the dough wrapped in plastic), roll out the dough into a 20 x 10-inch (about 51 x 25 ½ cm) rectangle. Spread half of the meringue evenly over the rectangle up to about 1/2-inch (3/4 cm) from the edges. Sprinkle half of your filling of choice evenly over the meringue (ex: half of the cinnamon-sugar followed by half the chopped nuts and half of the chocolate chips/chopped chocolate).
3. Now, roll up the dough jellyroll style, from the long side. Pinch the seam closed to seal. Very carefully transfer the filled log to one of the lined cookie sheets, seam side down. Bring the ends of the log around and seal the ends together, forming a ring, tucking one end into the other and pinching to seal.
4. Using kitchen scissors or a sharp knife (although scissors are easier), make cuts along the outside edge at 1-inch (2 ½ cm) intervals. Make them as shallow or as deep as desired but don’t be afraid to cut deep into the ring.
5. Repeat with the remaining dough, meringue and fillings. Cover the 2 coffee cakes with plastic wrap and allow them to rise again for 45 to 60 minutes.
6. Preheat the oven to 350°F (180°C). Brush the tops of the coffee cakes with the egg wash. Bake in the preheated oven for 25 to 30 minutes until risen and golden brown. The dough should sound hollow when tapped.
7. Remove from the oven and slide the parchment paper off the cookie sheets onto the table. Very gently loosen the coffee cakes from the paper with a large spatula and carefully slide the cakes off onto cooling racks. Allow to cool.
8. Just before serving, dust the tops of the coffee cakes with confectioner’s sugar as well as cocoa powder if using chocolate in the filling. These are best eaten fresh, the same day or the next day.

Sunday, February 27, 2011

Daring Bakers Feb 2011 - Mango Panna Cotta and Florentines


Blog Checking Lines: The February 2011 Daring Bakers’ challenge was hosted by Mallory from A Sofa in the Kitchen. She chose to challenge everyone to make Panna Cotta from a Giada De Laurentiis recipe and Nestle Florentine Cookies.

For this months challenge we had to make two things that were complete opposites. Soft, smooth and silky panna cotta with crispy, crunchy Florentines. While I have eaten panna cotta once before I had never even heard of Florentines. Whenever we have a challenge to make something I have not eaten before I feel a little lost as I have nothing to compare my results against. Though my cookies tasted good they did not spread out into thin discs. I guess I was supposed to flatten them with a spoon before putting them in the oven. I made only a quarter of the recipe and loved the cookies.
The panna cotta was very easy and straightforward to make. I replaced the honey and added mango pulp to make mango panna cotta and added a layer of mango jelly which I made using the pulp and gelatin. I reduced the recipe by a third because I didn't want to have so much of the creamy stuff to tempt me and still got 4 servings. I loved the taste of it but hubby was not a big fan. He wanted more of a mango punch and I ended up eating all four servings! (Over a few days mind you).


Ingredients - 1/3 of the Original Recipe with my changes in Red

1/3 Cup Whole Milk (80 ml)
1 Tsp (5 ml) Unflavored Powdered Gelatin
1 Cup (240 ml) Whipping Cream (30+% butterfat)
2 Tbsp (30 ml) Honey - I used 4 Tbsp Mango Pulp
1 Tsp (5 ml) Granulated Sugar - I used 2 Tsp
Pinch of Salt

1. Pour the milk into a bowl or pot and sprinkle gelatin evenly and thinly over the milk (make sure the bowl/pot is cold by placing the bowl/pot in the refrigerator for a few minutes before you start making the Panna Cotta). Let stand for 5 minutes to soften the gelatin.
2. Pour the milk into the saucepan/pot and place over medium heat on the stove. Heat this mixture until it is hot, but not boiling, about five minutes. (I whisk it a few times at this stage).
3. Next, add the cream, honey (I added the mango pulp after the sugar), sugar, and pinch of salt. Making sure the mixture doesn't boil, continue to heat and stir occasionally until the sugar and honey have dissolved 5-7 minutes.
4. Remove from heat, allow it to sit for a few minutes to cool slightly. Then pour into the glass or ramekin.
5. Refrigerate at least 6 hours or overnight. Add garnishes and serve.

Nestle Florentine Cookies

2/3 Cup (160 ml) (150 gm) (5.3 oz) Unsalted Butter
2 Cups (480 ml) (160 gm) (5 2/3 oz) Quick Oats

1 Cup Granulated Sugar
2/3 cup (160 ml) (95 gm) (3⅓ oz) All Purpose Flour (Maida)
1/4 cup (60 ml) Dark Corn Syrup - I used Lyle's Golden Syrup
1/4 Cup (60 ml) Whole Milk
1 Tsp Vanilla Extract
Pinch of Salt
1½ Cups (360 ml) (250 gm) (9 oz) Dark or Milk Chocolate - Prefer Semi Sweet as the cookies are quite sweet

1. Preheat oven to moderately hot 375°F (190°C) (gas mark 5). Prepare your baking sheet with silpat or parchment paper.
2. Melt butter in a medium saucepan, then remove from the heat.
3. To the melted butter add oats, sugar, flour, corn syrup, milk, vanilla, and salt. Mix well. Drop a tablespoon full, three inches (75 mm) apart, onto your prepared baking sheet. Flatten slightly with the back of your tablespoon, or use a spatula. (Flatten well as mine didn't spread on their own)
4. Bake in preheated oven for 6-8 minutes, until cookies are golden brown. Cool completely on the baking sheets.
5. While the cookies are cooling melt your chocolate until smooth either in the microwave (1 1/2 minutes), or stovetop (in a double boiler, or a bowl that fits atop a saucepan filled with a bit of water, being sure the water doesn't touch the bottom of the bowl).
6. Peel the cookies from the silpat or parchment and place face down on a wire rack set over a sheet of wax/parchment paper (to keep counters clean).
7. Spread a tablespoon of chocolate on the bottom/flat side of your cookie, sandwiching another (flat end) cookie atop the chocolate.

Happy Eating!!

Thursday, January 27, 2011

Daring Bakers Jan 2011 - Biscuit Jaconde Imprime


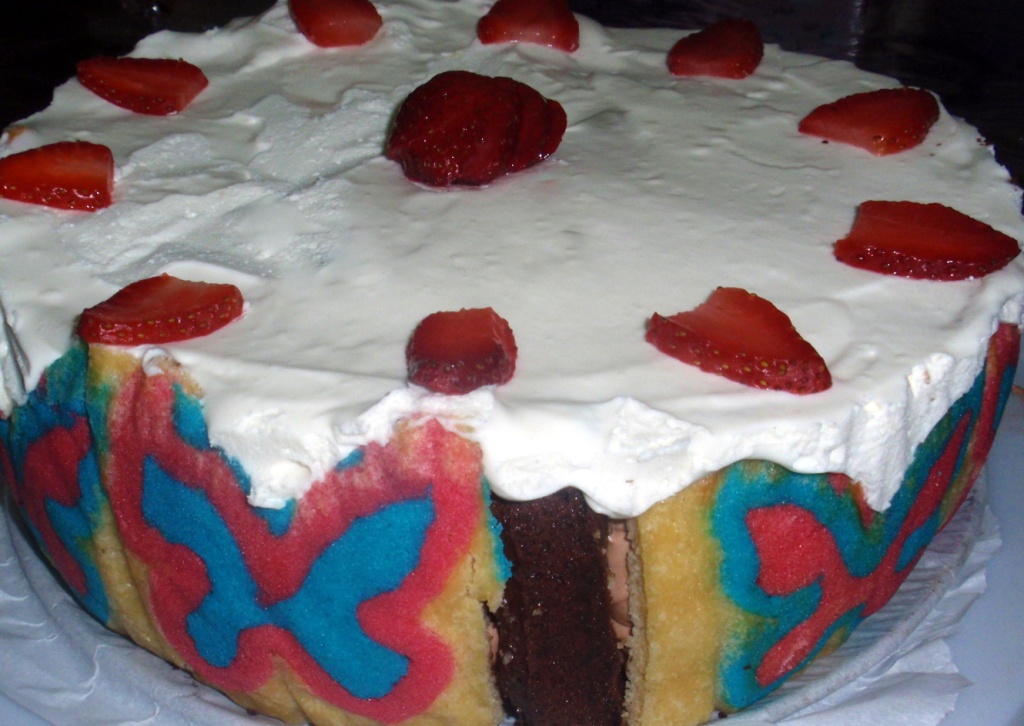
Jaconde what? That's what my first reaction was when I read this months DB challenge. This was something completely new to me and looked mighty difficult. However, after going through the recipe and seeing what some of the bakers made I decided to tackle it early on in the month. Since my parents and husband were both leaving to India, I made this as a good-bye treat. The imprime is the outer sponge of the dessert you can see in the picture.

Blog-checking lines: The January 2011 Daring Bakers’ challenge was hosted by Astheroshe of the blog accro. She chose to challenge everyone to make a Biscuit Joconde Imprime to wrap around an Entremets dessert.

I had great fun making this dessert and even though it is time consuming (three days), the ooh's and aah's make it all worth it. I spread the entire thing over three days as I didn't want to burden myself and things went very smoothly. I made a butterfly design with the decor paste (coloured pink and blue) and halved the sponge recipe. I ended up with a little less sponge and had to improvise with cut up pieces of the cake.

This is the order that I used to make the recipe
Make the decor paste
Make the design and freeze the paste on the tray
Make the sponge batter
Pour batter over frozen paste and bake
Cut and assemble.

Recipe - Patterned Joconde-Décor Paste (Makes Two ½ size sheet pans or a 13” x 18” (33 x 46 cm) jelly roll pan) I made 1/3 this recipe

Ingredients
14 Tbsp/ 210ml/ 7oz/ 200g Unsalted Butter (Softened)
1 1/2 Cups + 1 1/2 Tbsp/ 385ml/ 7oz/ 200g Confectioners' (icing) Sugar
7 Large Egg Whites - About 7 oz / 200g
1 3/4 Cup/ 420ml/ 7¾ oz/ 220g Cake Flour
Food coloring gel, paste or liquid

COCOA Décor Paste Variation: Reduce cake flour to 6 oz / 170g. Add 2 oz/ 60 g cocoa powder. Sift the flour and cocoa powder together before adding to creamed mixture.

1. Cream butter and sugar until light and fluffy (use stand mixer with blade, hand held mixer, or by hand)
2. Gradually add egg whites. Beat continuously.
3. Fold in sifted flour.
4. Tint batter with coloring to desired color, if not making cocoa variation.

Preparing the Joconde- How to make the pattern

1. Spread a thin even layer of décor paste approximately 1/4 inch (5 millimeter) thick onto silicone baking mat with a spatula, or flat knife. Place mat on an upside down baking sheet. The upside down sheet makes spreading easier with no lip from the pan. - I poured the paste into a pastry bag and drew the butterflies on parchment paper kept over a baking tray. Make sure your baking tray does not warp in the oven.
2. Pattern the décor paste – Here is where you can be creative. Make horizontal /vertical lines (you can use a knife, spatula, cake/pastry comb). Squiggles with your fingers, zig zags, wood grains. Be creative whatever you have at home to make a design can be used. OR use a piping bag. Pipe letters, or polka dots, or a piped design. If you do not have a piping bag. Fill a ziplock bag and snip off corner for a homemade version of one.
3. Slide the baking sheet with paste into the freezer. Freeze hard. Approx 15 minutes - It took around 30 mins for me.

Joconde Sponge (Makes Two ½ size sheet pans or a 13” x 18” (33 x 46 cm) jelly roll pan) - I halved this recipe

Ingredients
3/4 Cup/ 180 ml/ 3oz/ 85g Almond Flour/Meal - *You can also use hazelnut flour, just omit the butter
1/2 Cup Plus 2 Tbsp/ 150 ml/ 2⅔ oz/ 75g Confectioners' (icing) Sugar
1/4 Cup/ 60 ml/ 1 oz/ 25g Cake Flour (1 Cup Cake Flour = 3/4 Cup All purpose flour + 2 Tbsp Cornflour)
3 Large Eggs - about 5⅓ oz/ 150g
3 Large Egg Whites - About 3 oz/ 90g
2 1/2 Tsp/ 12½ ml/ ⅓ oz/ 10g White Granulate Sugar or Superfine Sugar
2 Tbsp/ 30 ml/ 1oz / 30g Unsalted Butter (Melted)

1.Pre heat oven to 475ºF /250ºC
2. In a clean mixing bowl whip the egg whites and white granulated sugar to firm, glossy peeks. Reserve in a separate clean bowl to use later.
3. Sift almond flour, confectioner’s sugar, cake flour. (This can be done into your dirty egg white bowl)
4. On medium speed, add the eggs a little at a time. Mix well after each addition. Mix until smooth and light. (If using a stand mixer use blade attachment. If hand held a whisk attachment is fine, or by hand. )
5. Fold in one third reserved whipped egg whites to almond mixture to lighten the batter. Fold in remaining whipped egg whites. Do not over mix.
6. Fold in melted butter.

Getting Ready to Bake
1. Remove the patterned tray from freezer. Quickly pour the Joconde batter over the design. Spread evenly to completely cover the pattern of the Décor paste.
2. Bake at 475ºF /250ºC until the joconde bounces back when slightly pressed, approx. 10 - 15 minutes. You can bake it as is on the upside down pan. Yes, it is a very quick bake, so watch carefully.

Assemble The Entremet
1. Cool. Do not leave too long, or you will have difficulty removing it from mat.
2. Flip cooled cake on to a powdered sugared parchment paper. Remove silpat. Cake should be right side up, and pattern showing! (The powdered sugar helps the cake from sticking when cutting.)
3. Trim the cake of any dark crispy edges. You should have a nice rectangle shape.
4. Decide how thick you want your “Joconde wrapper”. Traditionally, it is ½ the height of your mold (mine was a 9 Inch spring form pan). This is done so more layers of the plated dessert can be shown. However, you can make it the full height.
5. Once your height is measured, then you can cut the cake into equal strips, of height and length. (Use a very sharp paring knife and ruler.)
6. Make sure your strips are cut cleanly and ends are cut perfectly straight. Press the cake strips inside of the mold, decorative side facing out. Once wrapped inside the mold, overlap your ends slightly. You want your Joconde to fit very tightly pressed up to the sides of the mold. Then gently push and press the ends to meet together to make a seamless cake. The cake is very flexible so you can push it into place. You can use more than one piece to “wrap “your mold, if one cut piece is not long enough.
7. The mold is done, and ready to fill.

I will post separately on what I filled inside my mold.

Happy Eating!!