Sunday, January 30, 2011

Chocolate and Hazelnut Mousse Cake


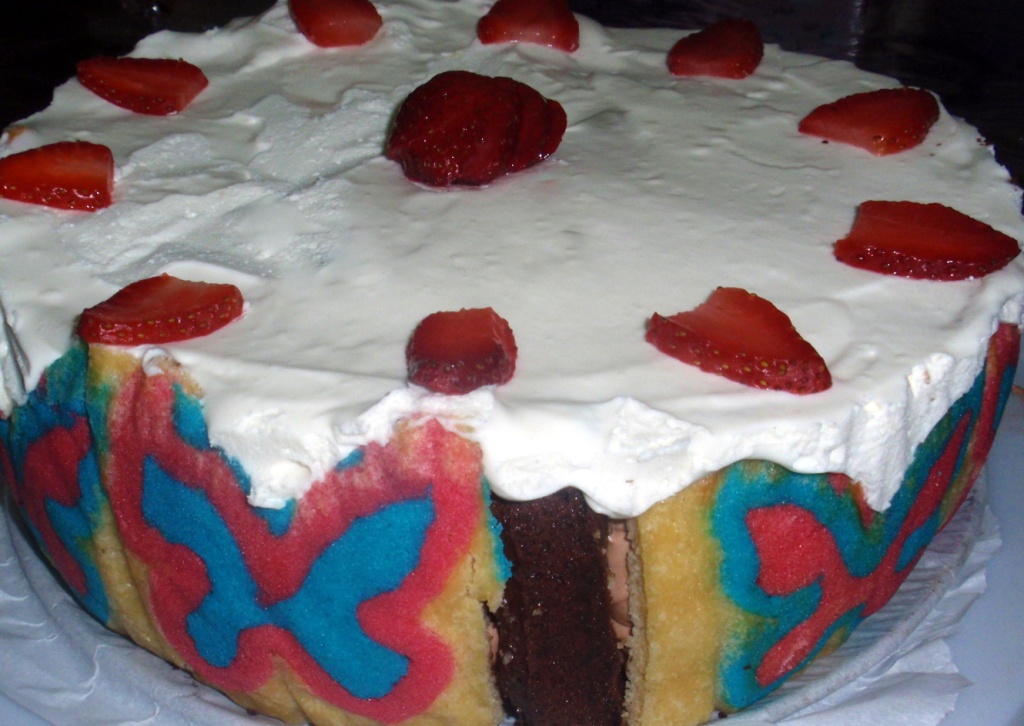
This is a rich cake. Eat slowly. Or you will repent. Not that I did! I made this entremet (oh what a fancy word!) as a part of this months Daring Bakers challenge and everyone loved it. This cake has three parts - A flourless chocolate cake, topped with chocolate hazelnut mousse and white chocolate whipped cream. The cake for the bottom layer doesn't take too much time and is very easy to prepare. Only thing was that I found it a little too bitter as I used a 70% dark chocolate, so next time I will use semi sweet (change given below). The hazelnut mousse requires something more to increase the hazelnut taste as mine was completely over powered with the chocolate in the nutella. Most of the reviewers added Frangelico but as I don't take alcohol, that was out. The original recipe has a chocolate mousse in the middle but I made the hazelnut mousse instead. This dessert can be made without the jaconde.

Update - I am linking this to Sweet As Sugar Cookies Linky Party.

Recipe Source - Adapted from Cook's Illustrated (November 1, 2009) via I am Baker and Gourmet (February 2006) via Epicurious

Ingredients
Bottom Layer - Flour less Chocolate Cake
6 Tbsp (3/4 Stick) Unsalted Butter (cut into 6 pieces, plus extra for greasing pan)
198 Grams (7 ounces) Semisweet Chocolate (Chopped Fine)
3/4 Tsp Instant Espresso Powder
1 1/2 Tsp Vanilla Extract
4 Large Eggs, Separated
Pinch of Salt
1/3 Cup Packed (about 2 1/2 ounces) Light Brown Sugar (Crumbled with fingers to remove lumps)
 
Middle Layer - Chocolate Hazelnut Mousse
1 1/2 Tsp Unflavored Gelatin
4 1/2 Tbsp Cold Water
1 Cup Chocolate Hazelnut Spread (E.g. Nutella)
1 Cup Whipped Cream Cheese (E.g Philadelphia)
3 Cups Chilled Heavy Cream
3 Tbsp Unsweetened Cocoa Powder
4 1/2 Tbsp Sugar

Top Layer - White Chocolate Whipped Cream
1/2 Tsp Powdered Gelatin
1 Tbsp Water
100 Gms (Approx 3.5 ounces) White Chocolate (Chopped)
3/4 Cups Cold Heavy Cream

Make The Bottom Layer
1. Adjust oven rack to middle position and heat oven to 165 degrees C (325 degrees F). Butter bottom and sides of 91/2-inch spring form pan. Place parchment paper on the bottom only (cut to fit the bottom).
2. Melt butter, chocolate, and espresso powder in large heatproof bowl set over saucepan filled with 1 inch of barely simmering water, stirring occasionally until smooth (I melted mine in the microwave) Remove from heat and cool mixture slightly, about 5 minutes. Whisk in vanilla and egg yolks; set aside.
3. In stand mixer fitted with whisk attachment, beat egg whites and salt at medium speed until frothy, about 30 seconds. Add half of brown sugar and beat until combined, about 15 seconds. Add remaining brown sugar and beat at high speed until soft peaks form when whisk is lifted, about 1 minute longer, scraping down sides halfway through. Using whisk, fold one-third of beaten egg whites into chocolate mixture to lighten. Using rubber spatula, fold in remaining egg whites until no white streaks remain. Carefully transfer batter to prepared spring form pan, gently smoothing top with offset spatula.
4. Bake until cake has risen, is firm around edges, and center has just set but is still soft (center of cake will spring back after pressing gently with finger), 13 to 18 minutes. Transfer cake to wire rack to cool completely, about 1 hour. (Cake will collapse as it cools.) Remove cake from pan and add the jaconde imprime to the spring form side if using.  Place the cake back on the base, add the spring form side and snap shut. (If not using the jaconde, do not remove cake from the pan and continue with next step).

Make The Middle Layer - Prepare after bottom layer has cooled completely
1. Sprinkle gelatin over water in a 1- to 1 1/2-quart heavy saucepan and let stand until softened, about 5 minutes. Heat gelatin mixture over low heat, stirring, just until gelatin is melted, about 2 minutes.
2. Whisk in chocolate hazelnut spread until combined and remove from heat.
3. Whisk together cheese and chocolate hazelnut mixture in a large bowl.
4. Beat together cream, cocoa powder, and sugar in another large bowl with an electric mixer at low speed until just combined, then increase speed to high and beat until cream just holds soft peaks. Whisk one third of whipped cream into cheese mixture to lighten, then fold in remaining whipped cream until well combined.
5. Spoon filling onto cake base in pan, gently smoothing top, then chill, covered, at least 3 hours.

Make the Top Layer - Prepare after middle layer has set.
1. In small bowl, sprinkle gelatin over water; let stand at least 5 minutes.
2. Place white chocolate in medium bowl. Bring 1/4 cup cream to simmer in small saucepan over medium-high heat. Remove from heat; add gelatin mixture and stir until fully dissolved. Pour cream mixture over white chocolate and whisk until chocolate is melted and mixture is smooth, about 30 seconds. Cool to room temperature, stirring occasionally, 5 to 8 minutes (mixture will thicken slightly).
3. In clean bowl of stand mixer fitted with whisk attachment, whip remaining 1/2 cup cream at medium speed until it begins to thicken, about 30 seconds. Increase speed to high and whip until soft peaks form when whisk is lifted, 15 to 60 seconds. Using whisk, fold one-third of whipped cream into white chocolate mixture to lighten. Using rubber spatula, fold remaining whipped cream into white chocolate mixture until no white streaks remain.
4. Spoon white chocolate mousse into pan over middle layer (make sure middle layer has set). Smooth top with offset spatula. Return cake to refrigerator and chill until set, at least 2½ hours. Unmold and serve. Cake should be served cold as it melts if kept out for too long.

Happy Eating!!

Thursday, January 27, 2011

Daring Bakers Jan 2011 - Biscuit Jaconde Imprime


Jaconde what? That's what my first reaction was when I read this months DB challenge. This was something completely new to me and looked mighty difficult. However, after going through the recipe and seeing what some of the bakers made I decided to tackle it early on in the month. Since my parents and husband were both leaving to India, I made this as a good-bye treat. The imprime is the outer sponge of the dessert you can see in the picture.

Blog-checking lines: The January 2011 Daring Bakers’ challenge was hosted by Astheroshe of the blog accro. She chose to challenge everyone to make a Biscuit Joconde Imprime to wrap around an Entremets dessert.

I had great fun making this dessert and even though it is time consuming (three days), the ooh's and aah's make it all worth it. I spread the entire thing over three days as I didn't want to burden myself and things went very smoothly. I made a butterfly design with the decor paste (coloured pink and blue) and halved the sponge recipe. I ended up with a little less sponge and had to improvise with cut up pieces of the cake.

This is the order that I used to make the recipe
Make the decor paste
Make the design and freeze the paste on the tray
Make the sponge batter
Pour batter over frozen paste and bake
Cut and assemble.

Recipe - Patterned Joconde-Décor Paste (Makes Two ½ size sheet pans or a 13” x 18” (33 x 46 cm) jelly roll pan) I made 1/3 this recipe

Ingredients
14 Tbsp/ 210ml/ 7oz/ 200g Unsalted Butter (Softened)
1 1/2 Cups + 1 1/2 Tbsp/ 385ml/ 7oz/ 200g Confectioners' (icing) Sugar
7 Large Egg Whites - About 7 oz / 200g
1 3/4 Cup/ 420ml/ 7¾ oz/ 220g Cake Flour
Food coloring gel, paste or liquid

COCOA Décor Paste Variation: Reduce cake flour to 6 oz / 170g. Add 2 oz/ 60 g cocoa powder. Sift the flour and cocoa powder together before adding to creamed mixture.

1. Cream butter and sugar until light and fluffy (use stand mixer with blade, hand held mixer, or by hand)
2. Gradually add egg whites. Beat continuously.
3. Fold in sifted flour.
4. Tint batter with coloring to desired color, if not making cocoa variation.

Preparing the Joconde- How to make the pattern

1. Spread a thin even layer of décor paste approximately 1/4 inch (5 millimeter) thick onto silicone baking mat with a spatula, or flat knife. Place mat on an upside down baking sheet. The upside down sheet makes spreading easier with no lip from the pan. - I poured the paste into a pastry bag and drew the butterflies on parchment paper kept over a baking tray. Make sure your baking tray does not warp in the oven.
2. Pattern the décor paste – Here is where you can be creative. Make horizontal /vertical lines (you can use a knife, spatula, cake/pastry comb). Squiggles with your fingers, zig zags, wood grains. Be creative whatever you have at home to make a design can be used. OR use a piping bag. Pipe letters, or polka dots, or a piped design. If you do not have a piping bag. Fill a ziplock bag and snip off corner for a homemade version of one.
3. Slide the baking sheet with paste into the freezer. Freeze hard. Approx 15 minutes - It took around 30 mins for me.

Joconde Sponge (Makes Two ½ size sheet pans or a 13” x 18” (33 x 46 cm) jelly roll pan) - I halved this recipe

Ingredients
3/4 Cup/ 180 ml/ 3oz/ 85g Almond Flour/Meal - *You can also use hazelnut flour, just omit the butter
1/2 Cup Plus 2 Tbsp/ 150 ml/ 2⅔ oz/ 75g Confectioners' (icing) Sugar
1/4 Cup/ 60 ml/ 1 oz/ 25g Cake Flour (1 Cup Cake Flour = 3/4 Cup All purpose flour + 2 Tbsp Cornflour)
3 Large Eggs - about 5⅓ oz/ 150g
3 Large Egg Whites - About 3 oz/ 90g
2 1/2 Tsp/ 12½ ml/ ⅓ oz/ 10g White Granulate Sugar or Superfine Sugar
2 Tbsp/ 30 ml/ 1oz / 30g Unsalted Butter (Melted)

1.Pre heat oven to 475ºF /250ºC
2. In a clean mixing bowl whip the egg whites and white granulated sugar to firm, glossy peeks. Reserve in a separate clean bowl to use later.
3. Sift almond flour, confectioner’s sugar, cake flour. (This can be done into your dirty egg white bowl)
4. On medium speed, add the eggs a little at a time. Mix well after each addition. Mix until smooth and light. (If using a stand mixer use blade attachment. If hand held a whisk attachment is fine, or by hand. )
5. Fold in one third reserved whipped egg whites to almond mixture to lighten the batter. Fold in remaining whipped egg whites. Do not over mix.
6. Fold in melted butter.

Getting Ready to Bake
1. Remove the patterned tray from freezer. Quickly pour the Joconde batter over the design. Spread evenly to completely cover the pattern of the Décor paste.
2. Bake at 475ºF /250ºC until the joconde bounces back when slightly pressed, approx. 10 - 15 minutes. You can bake it as is on the upside down pan. Yes, it is a very quick bake, so watch carefully.

Assemble The Entremet
1. Cool. Do not leave too long, or you will have difficulty removing it from mat.
2. Flip cooled cake on to a powdered sugared parchment paper. Remove silpat. Cake should be right side up, and pattern showing! (The powdered sugar helps the cake from sticking when cutting.)
3. Trim the cake of any dark crispy edges. You should have a nice rectangle shape.
4. Decide how thick you want your “Joconde wrapper”. Traditionally, it is ½ the height of your mold (mine was a 9 Inch spring form pan). This is done so more layers of the plated dessert can be shown. However, you can make it the full height.
5. Once your height is measured, then you can cut the cake into equal strips, of height and length. (Use a very sharp paring knife and ruler.)
6. Make sure your strips are cut cleanly and ends are cut perfectly straight. Press the cake strips inside of the mold, decorative side facing out. Once wrapped inside the mold, overlap your ends slightly. You want your Joconde to fit very tightly pressed up to the sides of the mold. Then gently push and press the ends to meet together to make a seamless cake. The cake is very flexible so you can push it into place. You can use more than one piece to “wrap “your mold, if one cut piece is not long enough.
7. The mold is done, and ready to fill.

I will post separately on what I filled inside my mold.

Happy Eating!!

Thursday, January 13, 2011

Russian Honey Cake - Medovyi Pirog


After a year of searching through the world wide web, I have successfully found it! What, you may ask. This recipe of course! Here is the background story. One day, my colleague bought this unusual looking cake to work. I had a piece and fell in love. It was so different and yet so tasty. I asked her for the recipe but as she had not made it she could not give it to me. I quickly logged onto the net and started searching for a Russian Honey Cake as I was told that was its name and it was famous in this part of the world. Well, my search revealed only two results and I was not sure if the outcome would be the same. Fast forward to a year later, and I ate the cake again. This time however, my search revealed a lot of results and I even got a recipe with pictures! Yay! I quickly went home and made the cake and got the exact same taste as I remembered. The simple ingredients morph into a fantastic taste and this is a great cake to serve to company.


This cake takes some to make, but it is very easy. you need to make the dough which takes like 5 minutes. Cool it and roll it out. Cut into shapes and bake. What you need to make sure is to stand near the oven like a hawk and keep an eye on these babies. They bake so quickly that you wont have time for anything else. I lost two precious layers to my negligence :( I halved the original recipe and still got a good cake to serve 5 - 6 people.

Recipe Source - Food.com

Ingredients - Makes approx. 15 layers of 8 inch each.

For the Cake Layers
2 Eggs
3/4 Cup Sugar
1 Tsp Baking Soda
1 Tbsp Liquid Honey
100 Gms (1/2 Cup/8 Tbsp) Unsalted Butter
2 Cups All Purpose Flour

For the Filling and Topping
750 Gms Sour Cream
1/2 Cup Sugar
1 Tbsp Honey
1/2 Cup Shredded Sweetened Coconut (Optional)

1. Preheat oven to 180°C.
2. Beat eggs well with sugar; add baking soda and liquid honey (warm).
3. Melt the margarine/butter in a pot over low flame; and add the above mixture (margarine should not be too hot).
4. Keeping the heat on low, add the flour a little at a time. Keep mixing until the mass is without lumps. (the mixture will be very thick and very hard to stir). Remove from heat and cool.


5. Take a big piece of dough, roll into a ball and dip the dough in flour. Place on parchment paper and roll into a very thin layer. (1-2mm). Using a round cutter (I used my saucepan lids-use something of minimum 8 inches in diameter) cut a circle as round as possible. 


7. To start, roll out at least 4 circles and place on separate parchment sheets. Place each circle in the oven and bake 180°C for 2-4 minutes (You can do two at a time or one by one) or until golden brown in colour; repeat with remaining dough and allow to cool before assembling. (Watch the cakes very carefully as they are done quickly and burn easily).


Make the Filling
Beat the sour cream, sugar and honey until the sugar dissolves-the mixture will still be fairly liquid.

Assemble The Cake
1.Take two cake layers (Use the most imperfect ones) and grind to make cake crumbs in the food processor. Keep aside.
2. Place one cake layer on a flat plate and add a generous layer of cream. Repeat till all the cake layers are finished. Coat the entire cake with the remaining cream.


3. Cover completely with the cake crumbs. Top with sweetened coconut if using.


4. Place in fridge and allow to set at least 6 hours before eating.

Happy Eating!!

Sunday, January 9, 2011

Dahi Vada


Last Saturday was a cooking marathon in my house as we were having guests for tea. As any Indian would know, having guests for tea time in India is big work. You see, you cannot offer them just tea and biscuits and have polite chit chat. There is major work involved here which means laborious time spent in the kitchen and cleaning the house top to bottom. Especially if these are first time visitors. The same thing happened here and I was dead by the end of the night. Thankfully my mom was there to help me and we shared the work between us. She made the Gajar Ka Halwa and Masala Aloo, while I made the Chicken Patties and Dahi Vada. Everything turned out good and I was ready for my guests at 4 p.m only to learn that would not  be arriving until 7 pm!! Grrr...

Making Dahi vada at home is very easy.. It may look like too much work but its done quickly and you have a big quantity of food for a little time and effort.

Recipe - From Everybunny Loves Food

Ingredients

1 Cup Urad Dal
A Pinch of Salt
Oil for Frying
4 Cups Thick Yogurt (Divided)
Sugar As Per Taste
Salt To Taste
Dahi Vada Chaat Masala or Coarsely ground Cumin (Jeera) and Coriander Seed (Dhanya) Powder
Tamarind Chutney (Recipe Below)
Water

1. Wash and soak the urad dal for 4 hours or overnight. Drain the water and grind coarsely with salt to taste. Try to add as little water as possible. The batter should be thick.
2. Heat the oil in a kadai (or a deep bottom vessel) and keep on medium flame till the oil is ready.
(Add a drop of the batter and if it rises slowly to the top the oil is ready to fry. If it rises too quickly lower the heat and if it does not rise at all increase the flame.)
3. While the oil is heating, fill a big bowl (3/4 of the way) with room temperature water and keep next to the gas.
4. Using a tablespoon, drop the batter into the hot oil. Make sure there is some space between each vada to prevent sticking.
Gently turn the vadas after 2 minutes and cook till light golden brown. Remove with a slotted spoon and put directly into the bowl of water.
5. Once all the vadas are fried and soaked in the water, remove them and squeeze gently to remove the water. Place in a deep serving dish or bowl and keep aside.
6. Take two cups of yogurt and mix with 1 cup water and mix till smooth. Pour over the vadas and refrigerate for 3 hours. (This step is crucial for the vadas to soak the yogurt and become moist.)
7. Mix the remaining yogurt with the sugar and a pinch of salt.
Take the vadas out of the fridge before serving and pour the sweetened yogurt over them. Add tamarind chutney, red chili powder and dahi vada chaat masala. Serve Cold.

Tamarind (Imli) Chutney Recipe

1/4 Cup Tamarind (Imli)
1 Cup Dates (pitted and soaked in water)
1/4 Cup Jaggery (Gud - Chopped in small pieces)
2 Tsp Roasted Cumin Powder
2 Tsp Red Chili Powder
Salt To Taste

Soak the tamarind in some water and remove all the pulp. Discard the waste. Grind the dates to a paste with some water and bring to boil over the flame. Add the tamarind pulp. Add the jaggery, chili powder, cumin powder, salt, garam masala and mix well.
Cook again on medium flame till jaggery dissolves completely and the chutney gets semi thick. Cool completely and refrigerate in an air tight container. If your fridge had good cooling the chutney will last upto 2 -3 weeks.

Note * - If you do not get ready made dahi wada masala use coarsely ground cumin (Zeera) and coriander seed (Dhanya) powder.

Happy Eating!!

Sunday, January 2, 2011

A Happy New Year And A Happy Breakfast


Wishing all my readers (yes, all three of you) a very happy new year!! I can't believe it's already been a year since I started blogging. And what a year it was. This last year was full of ups and downs for us and for the most part of it, it was a great year. I learnt a lot of new things in the kitchen and came out of my comfort zone. I joined the daring bakers, learnt how to make bread at home, made my own sugar cookies (and decorated with royal icing!!!), decorated a cake and even made cupcake pops! There is still so much more to learn and do and I really wish that I can pursue this passion of mine. So what are the things that I want to do this year? Let me list them down (in no particular order) Mind you, these are not any resolutions but just stuff I would like to do-

1. Learn swimming - seriously, its high time I know how to swim.
2. Get pregnant - Why do the virgins on T.V always get pregnant on their first time? No one tells us what hard work this is!!
3. Take up a cake decorating course - Any sponsors??
4. Lose weight - O.K. I know I said this last year as well, but I did manage to join the gym and lose a good 7 kgs. BUT. I stopped going and nothing has been the same since :(
5. Visit a new country - hubby and I have been planning this since forever but we never make it out of here.
6. Pray more - I have complete faith but when it comes to practice I am LAZY. If I don't want to reach hell I need to act fast!
7. Clean my house more often - Or better yet, get a maid! ha ha. (Hubby, are you listening?)
8. Make Marshmallow Fondant - Hello Crisco and mini marshmallows lying in my cupboards!
9. Learn to make better lists - I know this one is damn boring.
10 . Stop boring readers - No more lists, I promise!

Well that was my pretty boring list. What is not boring is this Stuffed French Toast. A great way to jazz up that plain morning breakfast. Instead of using french bread I used half of the Stollen that I had made for daring bakers. It was yummy! But I will make a few changes to it the next time I make it. Here is the recipe

Recipe Source - Given as is from Tasty Kitchen by Manda2177 with my notes in red.

Ingredients - Makes 6 Servings

1 Loaf French Bread - I used the stollen.
3 Tbsp Any Flavor Fruit Spread (You Can Also Use Jelly, Jam, Or Fresh Fruit)
1/2 Package Cream Cheese (100 Gms), At Room Temperature - Next time I will reduce this amount as it was too tangy for me
2 whole Eggs
1 Tablespoon Cinnamon - Omitted this since the stollen already had cinnamon.
1/2 Cups Skim Milk
2 Tbsp Butter
Golden Syrup for serving

1. Heat skillet or electric griddle to 325 to 350 degrees.
2. Cut french bread into 2 inch wide slices. Then, with a paring knife, go back and cut halfway into each slice, in the center, creating a ‘pocket’ that your fruit mixture can be stuffed into.
3. In a bowl, place the room temperature cream cheese and three tablespoons of fruit spread of your choice. (I used mixed fruit jam.) Combine well.
4. In a separate bowl, break 2 eggs; add cinnamon and milk and combine well.
5. Now, take fruit mixture and stuff into the ‘pockets’ of your french bread slices. Place on a baking sheet.
6. When done stuffing each piece of bread, completely coat each piece in egg mixture. Make sure all sides are covered. Do all pieces before starting to fry.
7. Put 2 tbsp (you can use less!) of butter into a hot skillet and melt completely. Add all of the bread to the skillet and cook roughly about 3-6 minutes on each side, until it reaches a nice golden brown. You want to make sure the cream cheese mixture heats through.

Serve hot with golden syrup or maple syrup.

Happy Eating!!