Tuesday, June 29, 2010

Gosht Aur Chana Dal ke Kebab (Meat Kebabs)


If you go to my parents house in Mangalore and open their freezer door, there is a 99% chance of you finding a box of these kebabs in there. My mom always keeps a batch of these ready in the freezer for unexpected guests or those sudden hunger pangs in the evening. These are melt in your mouth delicious and every guest who has ever eaten them will vouch for them. When I asked my mom for the recipe she was not able to give me any quantities as she never cooks by measurements (what is it with these mothers and guesstimates??). Anyways, I made them over the weekend and with a few changes I think I got the quantities right. These can be made either with Mutton or Beef but I prefer the beef ones. You can whip a batch and freeze them on a tray. Once they are frozen, remove and place in a plastic freezer bag to save space. They hardly take any time to thaw and make a great sandwich on bread with ketchup!

Recipe

Ingredients - Makes 18 Kebabs

1/2 Kg Boneless Beef or Mutton Pieces
4 Whole Red Chilies
4 Cloves Garlic
2 Tsp Garam Masala
1 Tsp Cumin Seeds (Zeera)
1 Cup Chana Dal (Bengal Gram)
1 Egg
1 Cup Onion (Finely Chopped)
1/2 Cup Mint Leaves (Chopped)
1/2 Cup Coriander Leaves (Chopped)
Salt To Taste

Place the meat, red chilies, garlic, garam masala, cumin powder and salt in a big pot with a little bit of water. Cook on medium heat till the meat is tender and evaporate any remaining water. Alternatively you can cook the meat in a pressure cooker. Boil the chana dal separately in very little water till soft. Once it is soft, keep stirring till all the water is evaporated and it is completely dry. Cool the meat and chana dal, then grind them with the egg in a food processor. Remove in a big bowl and add the chopped onion, chopped coriander, chopped mint and green chilies. Mix well. Oil your hands slightly to prevent it from sticking and form 18 small balls the size of a lemon. Flatten each ball in the palm of your hand to get a smooth round patty. Shallow fry on low heat in very little oil till the outside is slightly crisp. Serve hot with ketchup.

Happy Eating!!

Wednesday, June 23, 2010

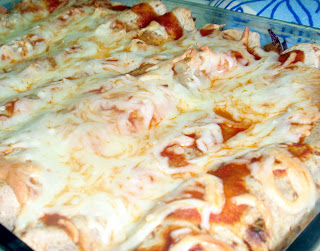
Chicken Enchiladas


Like any Food loving blogger, I love trying out new recipes and eating different cuisines. So it was only natural that when I saw this recipe at Annie's Eats I knew I had to make it. The chicken is cooked in a tomato based sauce which makes it soft and juicy. I used a different cheese (more because I only had mozarella on hand) than what the recipe called for and even though it was not authentic it was absolutely delicious. I was a bit hesitant to try it at first as Latif is not a fan of too much tomato in his food. So I decided to reduce the amount of the sauce that is added in the end before baking. As a result I got not too saucy enchiladas which were great to eat as leftovers too. I will be definitely making this again as it was a very easy recipe and it makes a lot of food!

Recipe Source – Annie's Eats (With my notes and changes in red)

Ingredients

1 Medium Onion, Chopped Fine (Used two as I wanted more bite)
2 Jalapenos, Seeded And Chopped Fine (Used pickled)
1 Tsp Canola Oil (Used Olive Oil)
3 Cloves Garlic, Minced
3 Tbsp Chili Powder
2 Tsp Cumin
1 Tbsp Sugar
1 (15 oz.) Can Tomato Sauce
1 Cup Water
1 Tomato, Seeded And Chopped
Salt And Pepper
500 Gms Boneless, Skinless Chicken Breasts
1 Cup Shredded Sharp White Cheddar Cheese, Divided (Used Mozzarella)
1 Cup Shredded Monterey Jack Cheese, Divided (Omitted)
1/2 Cup Minced Fresh Coriander Leaves
12 (6-inch) Soft Corn Tortillas
Cooking spray

Combine the onion, jalapeno and oil in a large saucepan over medium heat. Cook, stirring often, until the onions and peppers have softened, 8-10 minutes. Stir in the garlic, chili powder, cumin and sugar, and cook just until fragrant, less than 30 seconds. Mix in the tomato sauce, water, and chopped tomato. Bring the sauce to a simmer, lower the heat and cook until slightly thickened, about 5 minutes.

Nestle the chicken into the sauce. Reduce the heat to low, cover and cook until the chicken is completely cooked through, about 12-20 minutes. Transfer the chicken to a plate and set aside to cool.

Strain the sauce through a large mesh strainer into a medium bowl, pressing down on the onions and tomatoes to extract as much liquid as possible. Transfer the reserved solids to a large bowl and set aside. Season the sauce with additional salt and pepper to taste.

Shred the chicken into bite size pieces and add to the bowl with the onion mixture. Add in ¼ cup of the enchilada sauce, ½ cup of each of the shredded cheeses, and the coriander. Stir to combine.

Preheat the oven to 220 degree C (425 degree F). Oil a 9 x 13" baking dish with cooking spray (I used a smaller dish as I used only 8 tortillas) . Stack the tortillas on a plate, cover with plastic wrap, and microwave for 40-60 seconds, until warm and pliable. Spoon 1/3 cup (I used 1/2 cup filling for each) of the chicken mixture evenly down the center of a tortilla. Roll up the tortilla around the filling tightly, and place in the prepared baking dish, seam-side down. Repeat with the remaining filling and tortillas.

Lightly spray the tops of the enchiladas with cooking spray. Place in the oven, uncovered, for 7 minutes or until the tortillas start to brown slightly. Reduce the oven temperature to 205 degree C (400 degree F). Remove the enchiladas from the oven and pour the sauce over the top (I used only one cup of the sauce and freezed the remaining). Sprinkle with the remaining shredded cheese. Cover the dish with foil and bake for 20 minutes. Remove the foil and bake for 5 more minutes, until the cheese is browned. Remove from the oven and let stand 10 minutes before serving.

Happy Eating !!

Sunday, June 20, 2010

Chocolate Cupcakes with Whipped Cream Frosting


As I sat staring at my laptop screen my hands started twitching, palms sweating, I was having serious withdrawal symptoms. Something inside me was bursting to come out and I could not control it anymore. Don't worry I'm not on drugs or something but it was just the baker in me that was crying to be unleashed. You see, ever since I have joined the gym (ahem) I had put a hold to all the baking and stuff coz I didn't want any temptations around me. Well, after 45 days I was able to lose 4 kilos (yay me!!) and was so happy that I could no longer stop myself. Moreover I had these delicious mini chocolate chip cookies in my cupboard (thanks to my husband) and if I had to stop myself from eating them I knew I had to get rid of them somehow. So I decide to whip up a batch of chocolate cupcakes with the cookies in them and gave it off to my cousin!! Let someone else enjoy the calories !! Muaahahaha (evil laughter).

The cupcake recipe is a basic chocolate one and I added chunks of the cookie in it. The frosting is whipped cream with the powdered cookie added to it. The cakes definitely need the frosting as I found them a little bit dry on their own. The original recipe called for filling the cupcakes and next time I will surely do that. Or maybe a big cake with the frosting as filling. Yum! This frosting is my favorite as I don't like butter cream frosting that much.

Recipe Source -  Annies Eats

Ingredients - Makes 12 Cupcakes

For The Cupcakes
1 Cup plus 2 Tbsp plus 2 Tsp All Purpose Flour
1/2 Cup Unsweetened Cocoa Powder
3/4 Tsp Baking Powder
1/4 Tsp Baking Soda
1/4 Tsp Salt
6 Tbsp Unsalted Butter
1 Cup Firmly Packed Light Brown Sugar
1 Tsp Vanilla Essence
2 Eggs
3/4 Cup buttermilk, at room temperature
12 Chocolate Chocolate Chip Cookies (Broken in fours)

For The Frosting
3/4 Cup plus 3 Tbsp Whipping Cream
1 1/2 Tbsp Powdered Sugar
1/4 Tsp Vanilla Extract
3 Tbsp Chocolate Chip Cookie Crumbs

For Garnish
6 Mini Chocolate Chocolate Chip Cookies (Halved)

Preheat the oven to 180 degrees C (350 degrees F). Line one cupcake pans with paper liners.
In a medium bowl, sift together the flour, cocoa powder, baking powder, baking soda and salt; set aside. In the bowl of an electric mixer, beat the butter on medium speed until smooth. Gradually add the brown sugar and continue beating until fluffy, scraping down the sides of the bowl as needed. Beat in the vanilla. Add the eggs one at a time, beating well after each addition.
With the mixer on low speed, add the flour mixture in three additions, alternating with the buttermilk, beginning and ending with the flour mixture. Mix just until all the dry ingredients have been incorporated, being careful not to over mix. Add the broken cookie pieces and mix gently.
Divide the batter between the prepared cupcake liners. Bake until a toothpick inserted in the center comes out clean, about 18-20 minutes. (Mine were done in 15 minutes). Transfer the cupcakes to a wire rack and let cool to room temperature.

To prepare the frosting, in the clean bowl of an electric mixer fitted with the whisk attachment, combine the whipping cream, powdered sugar, and vanilla extract. Beat on medium-high speed until the whipped cream holds stiff peaks. Gently fold in the cookie crumbs with a spatula.

Scoop the mixture into a pastry bag and pipe frosting decoratively on top of the cupcakes. Garnish with the cookie halves.

Happy Eating!!

Sunday, June 6, 2010

Creamy Mashed or These Will Make Your Hips Wider Potatoes


A few days back when I reached home from work I saw a huge bag of potatoes on the kitchen counter. This is the conversation that followed:

Me - Where did these come from?

Latif - I ordered them from the grocery along with my cigarettes.

Me (starting to fume) - Exactly how much did you order?

Latif - Only 2 kgs.

By now I had lost it. You see, I never buy more than ½ a kilo of potatoes at a time as I don’t use too much of them and this guy had happily gone and ordered so much.

Me – What am I supposed to do with so many potatoes?

Latif – Make mashed potatoes. I want mashed potatoes.

I was stumped. Never had my husband asked for anything like this and never having made mashed potatoes for him I was a bit puzzled at this sudden request. Well, as I did have to start using the big mound I went off to The Pioneer Woman’s website where I had seen a delicious looking recipe. And delicious it was!! My oh my, these potatoes are amazing. I did reduce the quantities of butter, cheese and cream as I found them a bit too much but even then they were great. I can imagine what the original quantities would taste like. I used only three medium sized potatoes and it was more than enough for the two of us. Also, as we ate them immediately after cooking I think the oven step is not needed. I preferred them before they went in the oven as they became a little dry. This could be because there was lesser cheese and cream in them than in the original recipe. Whatever way you make these, they are going to be absolutely fantastic! 

Here is the recipe at the Pioneer Woman website.

Happy Eating!!

Thursday, June 3, 2010

Aloo Palak


All through my years of growing up (and even when I had grown up all I could) I would carry a lunch box with me for my afternoon meal. First through 10 years of school, then five years of college and even during the three years that I worked before I got married. This lunch box was of course prepared by my darling mother, who would have a harrowing time everyday thinking what to give her picky daughter for lunch. Not that I am very picky when it comes to food, but something about eating cold food in the confines of a classroom was very boring. Moreover, I never had the brains to buy one of those boxes that keep your food warm or microwave my food before eating. My meal would always consist of one roti and one vegetable. I would rarely take rice and some days (the happier ones) would take chicken or mutton. I can actually write down all the vegetable dishes that I used to take as they were repeated on weekly basis (perhaps this has something to do with my aversion to Moong). Anywho, this aloo palak was one of the honored dishes on that rotation and I now bring to you the recipe. It is simple, delicious and reminds me of my mom every time I eat it. Now that I have to make my own lunch everyday I would give anything for the weekly rotation of veggies and roti ;)

Recipe

Ingredients - Serves 2
4 Cups Spinach – Washed and Chopped
1 Medium Potato
4 Cloves Garlic (Crushed)
1/2 Tsp Turmeric Powder
2 Green Chilies (Slit Halfway Vertically)
1/2 Tsp Cumin
1 Tbsp Cooking Oil 
Salt  To Taste

Heat the oil in a pot; add the green chilies, garlic and cumin and sauté till the garlic is fragrant. Add the potatoes, salt, turmeric powder, and a little water. Cover and cook on low flame till the potatoes are completely cooked. Add the chopped spinach and cook on medium heat, stirring in ten second intervals. Cook till the raw smell of the spinach goes away and it acquires a dark green colour. Serve hot with roti or as a side with dal and rice.

Happy Eating!!