
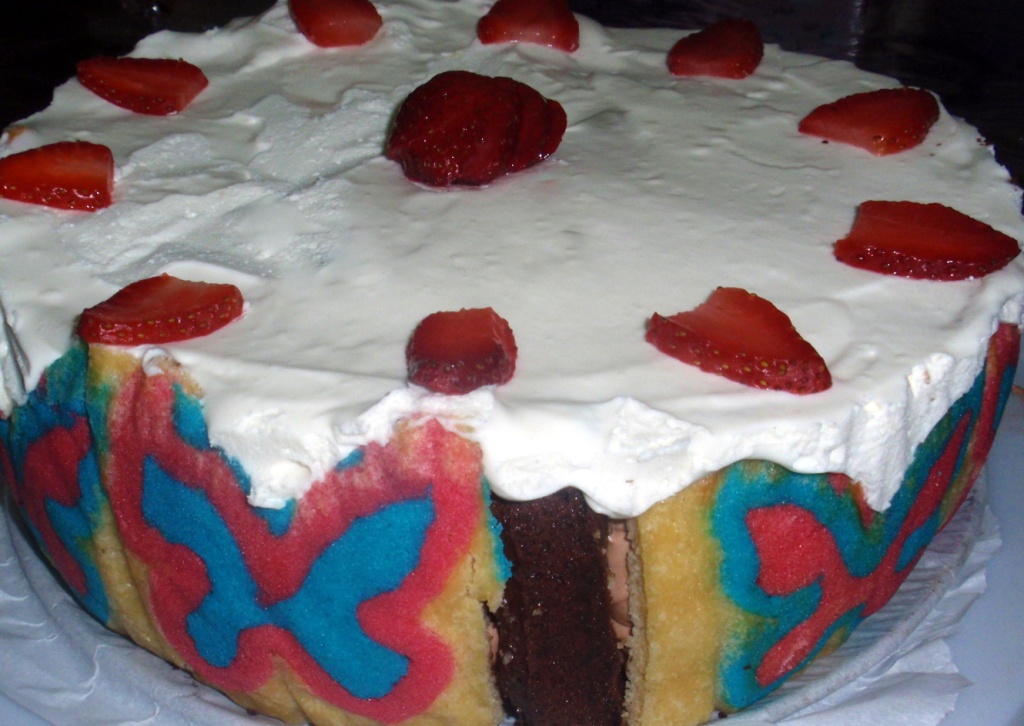
Jaconde what? That's what my first reaction was when I read this months DB challenge. This was something completely new to me and looked mighty difficult. However, after going through the recipe and seeing what some of the bakers made I decided to tackle it early on in the month. Since my parents and husband were both leaving to India, I made this as a good-bye treat. The imprime is the outer sponge of the dessert you can see in the picture.
Blog-checking lines: The January 2011 Daring Bakers’ challenge was hosted by Astheroshe of the blog accro. She chose to challenge everyone to make a Biscuit Joconde Imprime to wrap around an Entremets dessert.
I had great fun making this dessert and even though it is time consuming (three days), the ooh's and aah's make it all worth it. I spread the entire thing over three days as I didn't want to burden myself and things went very smoothly. I made a butterfly design with the decor paste (coloured pink and blue) and halved the sponge recipe. I ended up with a little less sponge and had to improvise with cut up pieces of the cake.
This is the order that I used to make the recipe
Make the decor paste
Make the design and freeze the paste on the tray
Make the sponge batter
Pour batter over frozen paste and bake
Cut and assemble.
Recipe - Patterned Joconde-Décor Paste (Makes Two ½ size sheet pans or a 13” x 18” (33 x 46 cm) jelly roll pan) I made 1/3 this recipe
Ingredients
14 Tbsp/ 210ml/ 7oz/ 200g Unsalted Butter (Softened)
1 1/2 Cups + 1 1/2 Tbsp/ 385ml/ 7oz/ 200g Confectioners' (icing) Sugar
7 Large Egg Whites - About 7 oz / 200g
1 3/4 Cup/ 420ml/ 7¾ oz/ 220g Cake Flour
Food coloring gel, paste or liquid
COCOA Décor Paste Variation: Reduce cake flour to 6 oz / 170g. Add 2 oz/ 60 g cocoa powder. Sift the flour and cocoa powder together before adding to creamed mixture.
1. Cream butter and sugar until light and fluffy (use stand mixer with blade, hand held mixer, or by hand)
2. Gradually add egg whites. Beat continuously.
3. Fold in sifted flour.
4. Tint batter with coloring to desired color, if not making cocoa variation.
Preparing the Joconde- How to make the pattern
1. Spread a thin even layer of décor paste approximately 1/4 inch (5 millimeter) thick onto silicone baking mat with a spatula, or flat knife. Place mat on an upside down baking sheet. The upside down sheet makes spreading easier with no lip from the pan. - I poured the paste into a pastry bag and drew the butterflies on parchment paper kept over a baking tray. Make sure your baking tray does not warp in the oven.
2. Pattern the décor paste – Here is where you can be creative. Make horizontal /vertical lines (you can use a knife, spatula, cake/pastry comb). Squiggles with your fingers, zig zags, wood grains. Be creative whatever you have at home to make a design can be used. OR use a piping bag. Pipe letters, or polka dots, or a piped design. If you do not have a piping bag. Fill a ziplock bag and snip off corner for a homemade version of one.
3. Slide the baking sheet with paste into the freezer. Freeze hard. Approx 15 minutes - It took around 30 mins for me.
Joconde Sponge (Makes Two ½ size sheet pans or a 13” x 18” (33 x 46 cm) jelly roll pan) - I halved this recipe
Ingredients
3/4 Cup/ 180 ml/ 3oz/ 85g Almond Flour/Meal - *You can also use hazelnut flour, just omit the butter
1/2 Cup Plus 2 Tbsp/ 150 ml/ 2⅔ oz/ 75g Confectioners' (icing) Sugar
1/4 Cup/ 60 ml/ 1 oz/ 25g Cake Flour (1 Cup Cake Flour = 3/4 Cup All purpose flour + 2 Tbsp Cornflour)
3 Large Eggs - about 5⅓ oz/ 150g
3 Large Egg Whites - About 3 oz/ 90g
2 1/2 Tsp/ 12½ ml/ ⅓ oz/ 10g White Granulate Sugar or Superfine Sugar
2 Tbsp/ 30 ml/ 1oz / 30g Unsalted Butter (Melted)
1.Pre heat oven to 475ºF /250ºC
2. In a clean mixing bowl whip the egg whites and white granulated sugar to firm, glossy peeks. Reserve in a separate clean bowl to use later.
3. Sift almond flour, confectioner’s sugar, cake flour. (This can be done into your dirty egg white bowl)
4. On medium speed, add the eggs a little at a time. Mix well after each addition. Mix until smooth and light. (If using a stand mixer use blade attachment. If hand held a whisk attachment is fine, or by hand. )
5. Fold in one third reserved whipped egg whites to almond mixture to lighten the batter. Fold in remaining whipped egg whites. Do not over mix.
6. Fold in melted butter.
Getting Ready to Bake
1. Remove the patterned tray from freezer. Quickly pour the Joconde batter over the design. Spread evenly to completely cover the pattern of the Décor paste.
2. Bake at 475ºF /250ºC until the joconde bounces back when slightly pressed, approx. 10 - 15 minutes. You can bake it as is on the upside down pan. Yes, it is a very quick bake, so watch carefully.
Assemble The Entremet
1. Cool. Do not leave too long, or you will have difficulty removing it from mat.
2. Flip cooled cake on to a powdered sugared parchment paper. Remove silpat. Cake should be right side up, and pattern showing! (The powdered sugar helps the cake from sticking when cutting.)
3. Trim the cake of any dark crispy edges. You should have a nice rectangle shape.
4. Decide how thick you want your “Joconde wrapper”. Traditionally, it is ½ the height of your mold (mine was a 9 Inch spring form pan). This is done so more layers of the plated dessert can be shown. However, you can make it the full height.
5. Once your height is measured, then you can cut the cake into equal strips, of height and length. (Use a very sharp paring knife and ruler.)
6. Make sure your strips are cut cleanly and ends are cut perfectly straight. Press the cake strips inside of the mold, decorative side facing out. Once wrapped inside the mold, overlap your ends slightly. You want your Joconde to fit very tightly pressed up to the sides of the mold. Then gently push and press the ends to meet together to make a seamless cake. The cake is very flexible so you can push it into place. You can use more than one piece to “wrap “your mold, if one cut piece is not long enough.
7. The mold is done, and ready to fill.
I will post separately on what I filled inside my mold.
Happy Eating!!
This is so lovely! I love the butterflies and they must have absolutely loved the goodbye cake! :)
ReplyDeleteThe butterflies are great, such a good idea.
ReplyDelete